User management with Django allauth
As you've see throughout this
chapter, the django.contrib.auth package provides a
great deal of functionality to manage users and groups,
permissions, as well as authentication workflows. But as you've
probably also realized, the django.contrib.auth
package can also suffer from a lot of legacy behaviors that don't
work well for web applications in today's day in age. For example,
django.contrib.auth doesn't support things like social
authentication -- which is almost a requirement in today's Internet
-- in addition, django.contrib.auth is also designed
to work with usernames out-of-the-box -- and not emails -- which is
also a very outdated practice.
Still because the
django.contrib.auth package is built into Django,
there are often many Django packages (e.g.the Django admin &
other third party packages) that assume a Django project uses the
django.contrib.auth package and its
functionalities.
So on the one hand, it's
essential you keep using the django.contrib.auth
package to maintain user management compatibility across other
Django packages that expect the presence of
django.contrib.auth, but on the other, you don't want
to be stuck with 2005 practices asking users to provide usernames
and not allowing them to authenticate with social media
accounts.
Among the many third party
packages and potential solutions available to solve this Django
user management integration, the Django allauth package offers one
of the best features set (e.g. social authentication and e-mail
based users), as well as the best integration with the
django.contrib.auth package. So up next, I'll describe
the set up process for the Django allauth package.
Install and setup django-allauth
To install the Django allauth
package, use the following pip statement:
pip install django-allauth
Once you make the installation, let's create a base Django allauth configuration with the intent to fulfill the following user management features:
- Use email as the primary user identifier, but maintain username credentials for compatibility with other packages (e.g. Django admin).
- Require email verification to avoid junk users.Set the foundations to add Django social authentication (Facebook, Google,Twitter)
Listing 10-17 illustrates the
necessary additions to make to a project's settings.py
file, to enable a base Django allauth configuration with these
features.
Listing 10-17. Base Django allauth settings.py configuration
# Ensure the 'django.contrib.sites' is declared in INSTALLED_APPS
# And also add the allauth, allauth.account and allauth.socialaccount to INSTALLED_APPS
INSTALLED_APPS = [
    # Django sites app  required
    'django.contrib.sites',
    'allauth',
    'allauth.account',
    'allauth.socialaccount',
]

# Ensure SITE_ID is set sites app
SITE_ID = 1

# Add the 'allauth' backend to AUTHENTICATION_BACKEND and keep default ModelBackend
AUTHENTICATION_BACKENDS = [ 'django.contrib.auth.backends.ModelBackend',
                           'allauth.account.auth_backends.AuthenticationBackend']
# EMAIL_BACKEND so allauth can proceed to send confirmation emails
# ONLY for development/testing use console
EMAIL_BACKEND='django.core.mail.backends.console.EmailBackend'

# Custom allauth settings
# Use email as the primary identifier
ACCOUNT_AUTHENTICATION_METHOD = 'email'
ACCOUNT_EMAIL_REQUIRED = True

# Make email verification mandatory to avoid junk email accounts
ACCOUNT_EMAIL_VERIFICATION = 'mandatory'

# Eliminate need to provide username, as it's a very old practice
ACCOUNT_USERNAME_REQUIRED = False
In addition to the changes in
listing 10-17 to the settings.py file, you'll also
need to register the Django allauth url entry points in the main
urls.py file. Listing 10-18 illustrates the changes
you need to make to the main urls.py file.
Listing 10-18. Django allauth url configuration urls.py
urlpatterns = [
    ...
    url(r'^accounts/', include('allauth.urls')),
    ...
]
As you can see in listing 10-18,
the url regular expression tells Django to mount the Django allauth
allauth.urls urls under the /accounts/
path, just like it's done for the standard Django
django.contrib.auth package urls back in listing 10-11.
Django allauth uses the same url
patterns and behaviors almost exactly as the standard
django.contrib.auth package. This means Django allauth
configures its log in page at the /accounts/login/ url
and the log out page at the /accounts/logout/ url.
Django allauth does include a series of new urls in its
include() statement from listing 10-18 (e.g. email
verification), but I'll describe these new urls as we move
forward.
Similarly, the same
settings.py variables used for authentication purposes
by the standard django.contrib.auth package are also
applicable to Django allauth. For example, you can set
LOGIN_URL to override the default
/accounts/login/ url location and you can also set the
LOGIN_REDIRECT_URL which defaults to the
/accounts/profile/ url. In fact, just like the
django.contrib.auth package, Django all auth doesn't
include the /accounts/profile/ url entry point, so you
may as well override the LOGIN_REDIRECT_URL variable
in settings.py to point to another url
(e.g.LOGIN_REDIRECT_URL='/' to redirect the user to
the home page after a successful log in).
Finally, once you've followed these configuration steps, you need to do the following miscellaneous steps to ensure Django allauth runs correctly:
- Run
python manage.py migratefrom the command line, to ensure all the database tables required by Django allauth are created. - Ensure the
django.contrib.sitespackage reflects the application's domain. By default, thedjango.contrib.sitesdefaults to the domainexample.com, you can change this value in the Django admin to ensure certain features (e.g. email) uses the correct application domain.
First log in and log out with superuser in Django allauth
First, create a Django superuser
using any of the techniques outlined at the start of this chapter
in listing 10-1 and take note of the email. Next, go straight to
the /accounts/login/ url and you'll see page like the
one illustrated in figure 10-11.
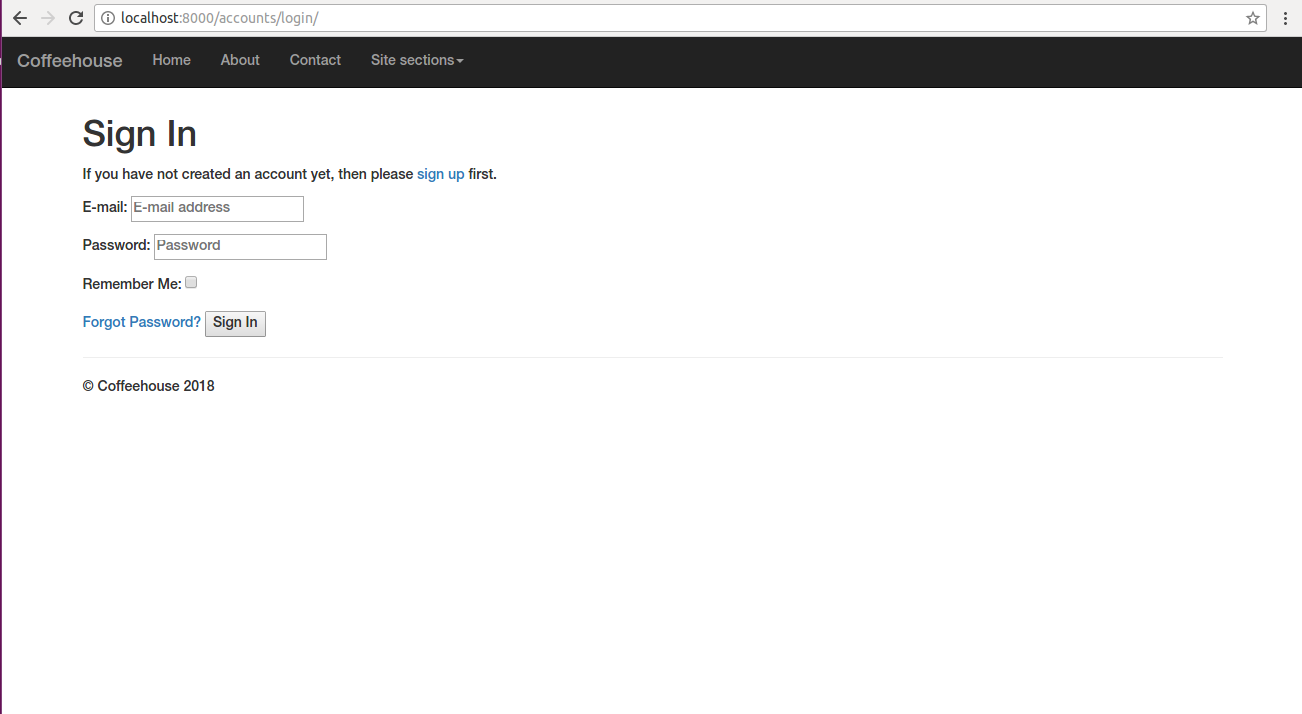
Figure 10-11 Django allauth defult log in screen
Now let's pause for a second and
contemplate what Django allauth just provided. Figure 10-11
illustrates a log in page for which you didn't even have to create
its template -- unlike the django.contrib.auth the log
in workflow. In addition, notice the log in form in figure 10-11
asks for an email credential and you didn't even need to create a
custom authentication back-end to support this functionality
either.
Next, introduce the superuser
email/password into the sign in form in figure 10-11 and click on
the 'Sign in' button, if the credentials are correct, you'll be
re-directed to a 'Verify your E-mail address' page. This is by
design, remember in listing 10-17 the base Django allauth
configuration enforce email verification (
ACCOUNT_EMAIL_VERIFICATION = 'mandatory'), therefore
until the user's email address is verified, access is denied.
If you're using the same email settings described in listing 10-17 -- to send emails to the console -- you will see an email like the one in listing 10-18 where you're running the Django development server.
Listing 10-18. Confirm email for new user in django-allauth
MIME-Version: 1.0
Content-Type: text/plain; charset="utf-8"
Content-Transfer-Encoding: 7bit
Subject: [coffeehouse.com] Please Confirm Your E-mail Address
From: webmaster@localhost
To: cashier@coffeehouse.com
Date: Wed, 12 Aug 2018 00:57:50 -0000
Message-ID: <20180812005750.15177.32621@laptop>
Hello from coffeehouse.com!
You're receiving this e-mail because user daniel at example.com has given yours
as an e-mail address to connect their account. To confirm this is correct, go to
http://localhost:8000/accounts/confirm-email/1aflixsbb6sn14hb96u8y3gotxzep0qie/
Thank you from coffeehouse.com!
coffeehouse.com
Copy and paste the verification
link in the email to your browser. Once you click on the
verification link, you'll be asked to confirm the user's email.
When you click on the 'Confirm' button to make the final
verification, you'll be sent to the /accounts/login/
url once again showing a small flash message indicating the account
was confirmed.
Now reintroduce the superuser
email/password into the sign in form in figure 10-11 once again and
click on the 'Sign in' button. This time you'll be redirect to
/accounts/profile/ url or the url defined in the
LOGIN_REDIRECT_URL variable in
settings.py.
At this point, you're logged into
the application as a superuser using the log in workflow from
provided by Django allauth. Next, go directly to the Django admin
/admin/ url and you can confirm you're able to access
it directly! In this case, there's no need to re-authenticate
yourself using the Django admin form, because you already logged-in
using the Django allauth workflow.
Finally, in order to log out of
the application you can visit the /accounts/logout/
url, where you'll be presented with a confirmation question asking
if you're sure you want to log out, clicking on the 'Sign out'
button materializes the log out action.
As you can see from this
exercise, Django allauth provides very tight integration with the
standard log in workflow used by the Django admin and the
django.contrib.auth package, on top of the features
already outlined: email verification, built-in templates, built-in
authentication workflow with email and backward compatibility with
usernames.
User sign up with Django allauth
If you review the
/accounts/login/ url illustrated in figure 10-11, you
can see there's a 'Sign up' link that takes you to the URL
/accounts/signup/. Click on this link, and you'll
be presented with a form that asks for an email and a password to
create a user account.
Once you fill out the form, click on the 'Sign up' button. If the submission is successful, you'll be re-directed to the 'Verify your E-mail address' page. This is the same behavior described in the previous section, due to Django allauth requiring email verification before allowing access to an application.
Similarly, proceed to inspect the email generated by Django allauth and copy-paste the verification link to complete the user sign up process. Next, you can proceed to log in with this user's credentials, which default to a regular user.
An interesting point about this sign up process that may not be obvious, is Django allauth creates a user using only his email. Which raises some questions, what happens if this user later becomes a superuser or staff member to access the Django admin ? Will the Django admin login form that relies on usernames not work ? Nothing of sort, it will work as expected.
Behind the scenes, Django allauth creates a regular Django user and integrates it with Django allauth features (e.g. email log-in, social authentication). This built-in integration is an excellent feature because you get all the benefits of Django allauth, plus users get to keep Django's default user management where the same user can get: Django admin access, superuser & staff permissions, ability to belong to groups and permission assignment.
The convention Django allauth
uses to create usernames is to take an email's local part (i.e.
anything before @) as the username handle. For cases where multiple
emails with the same name create an account, Django allauth assign
a digit to the username
(e.g.nancy@coffeehouse.com=nancy,
nancy@hotmail.com=nancy2,
nancy@gmail.com=nancy3).
Password reset and change with Django allauth
One of the most common management
task required by users is often related to passwords, whether it's
resetting their password because they forgot it or changing it for
security reasons. Django allauth provides built-in support for both
these password scenarios. If you go to the
/accounts/password/reset/ url you'll see a form where
a user can introduce his email to reset his password.
Once you introduce an email on this last form, click on the 'Reset My Password' button and Django allauth sends a confirmation email like the one in listing 10-19 with a password reset link.
Listing 10-19 Reset email for new password django-allauth
MIME-Version: 1.0
Content-Type: text/plain; charset="utf-8"
Content-Transfer-Encoding: 7bit
Subject: [coffeehouse.com] Password Reset E-mail
From: webmaster@localhost
To: nancy@coffeehouse.com
Date: Wed, 19 Aug 2018 03:05:09 -0000
Message-ID: <20180819030509.15780.98825@laptop>
Hello from coffeehouse.com!
You're receiving this e-mail because you or someone else has requested a password for your user account
at coffeehouse.com. It can be safely ignored if you did not request a password reset.
Click the link below to reset your password.
http://localhost:8000/accounts/password/reset/key/5-44f-0f6fbf1251fd33ee4b40/
Thank you for using coffeehouse.com!
coffeehouse.com
-------------------------------------------------------------------------------
Next, if you click on the reset link in the email you'll be taken to another page where you can introduce a new password. After you click on the 'Change password' button, and if the process is successful, you'll see a password confirmation flash message indicating the user password was updated.
The other option available in
django-allauth related to passwords is to allow a users to change
their password while they're logged in. If you go to the
/accounts/password/change/ url you'll see a screen
with a form to introduce a new password. After you click on the
'Change Password' button, you'll see a confirmation message on the
same screen indicating the user password was updated.
Add and change user email with Django allauth
To aid users in the possibility
of changing their initial email sign up address, Django allauth has
a dedicated page to manage email addresses. If you go to the
/accounts/email/ url you'll see the page illustrated
in figure 10-12.
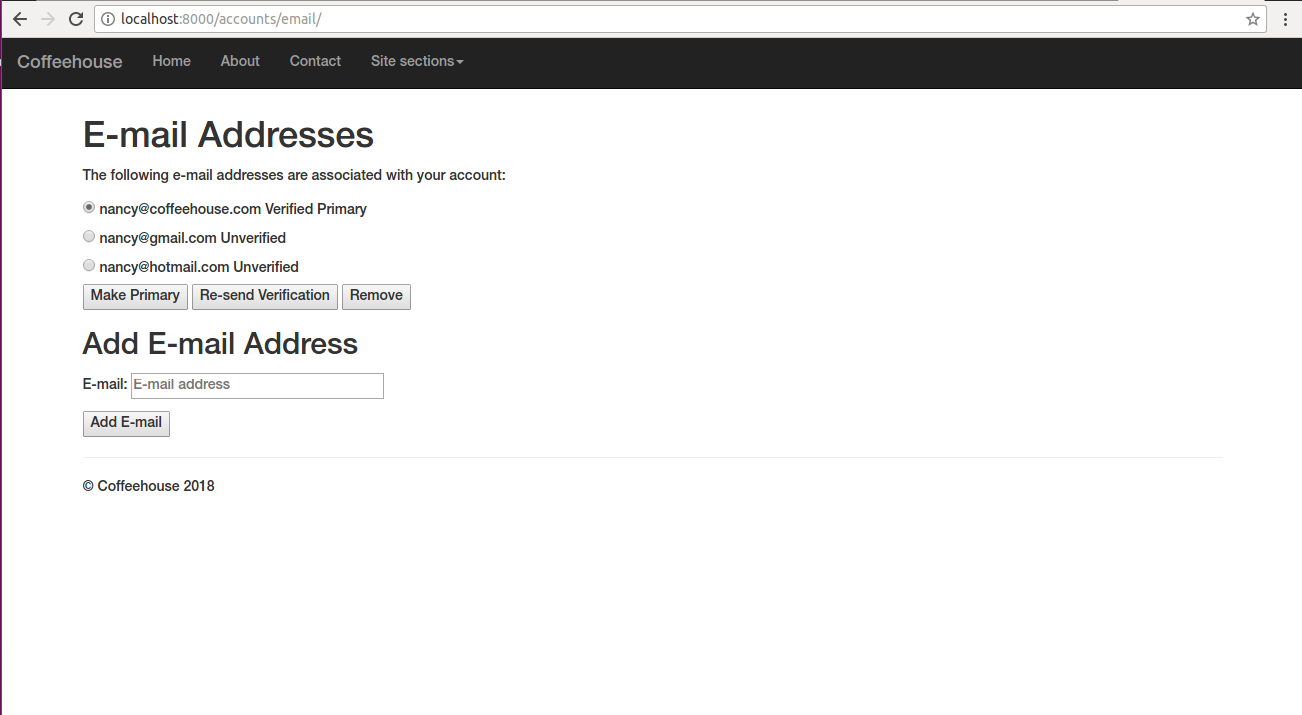
Figure 10-12. Django allauth email management
As you can see in figure 10-12, in addition to the possibility of adding other emails to the account, a user can also change his primary email, re-send a verification for an email or even remove an email associated with an account.
Change templates for Django allauth
The Django allauth built-in
templates provide basic functionality as you've seen in the
previous sections. All the built-in templates inherit their
behavior from a template named base.html and their
content in enclosed in {% block content %}{% block %}.
This means you can create a template called base.html
in your Django project with all the elements you wish (e.g. custom
colors, header menu) and declare the {% block content %}{%
block %} in it and the Django allauth built-in templates are
rendered in this context.
If you want to fully customize the templates used by Django allauth (e.g. to include mobile-friendly forms or some other deep change), you can provide overriding templates in your Django project.
Django allauth relies on over
fifteen HTML templates and six email templates, for this reason,
it's easier if you copy the Django allauth default templates to
your Django project and then modify them as needed. You should
ensure the Django allauth templates are copied with their original
account sub-folder that should be accessible under a
DIRS value of the TEMPLATES variable in
settings.py. Depending on your Python installation,
the default Django allauth templates can be found on the path
/lib/python3.5/site-packages/allauth/templates/.
Tip See the book's accompanying source code which includes the layout of all Django allauth templates.
Models and database tables behind Django allauth
Although Django allauth leverages
Django's default user model
django.contrib.auth.models.User or a custom user model
if it's provided as part of the AUTH_USER_MODEL
configuration, Django allauth relies on a a series of new models to
support its advanced user management features. Figure 10-13
illustrates the Django admin showcasing the series of Django
allauth models.
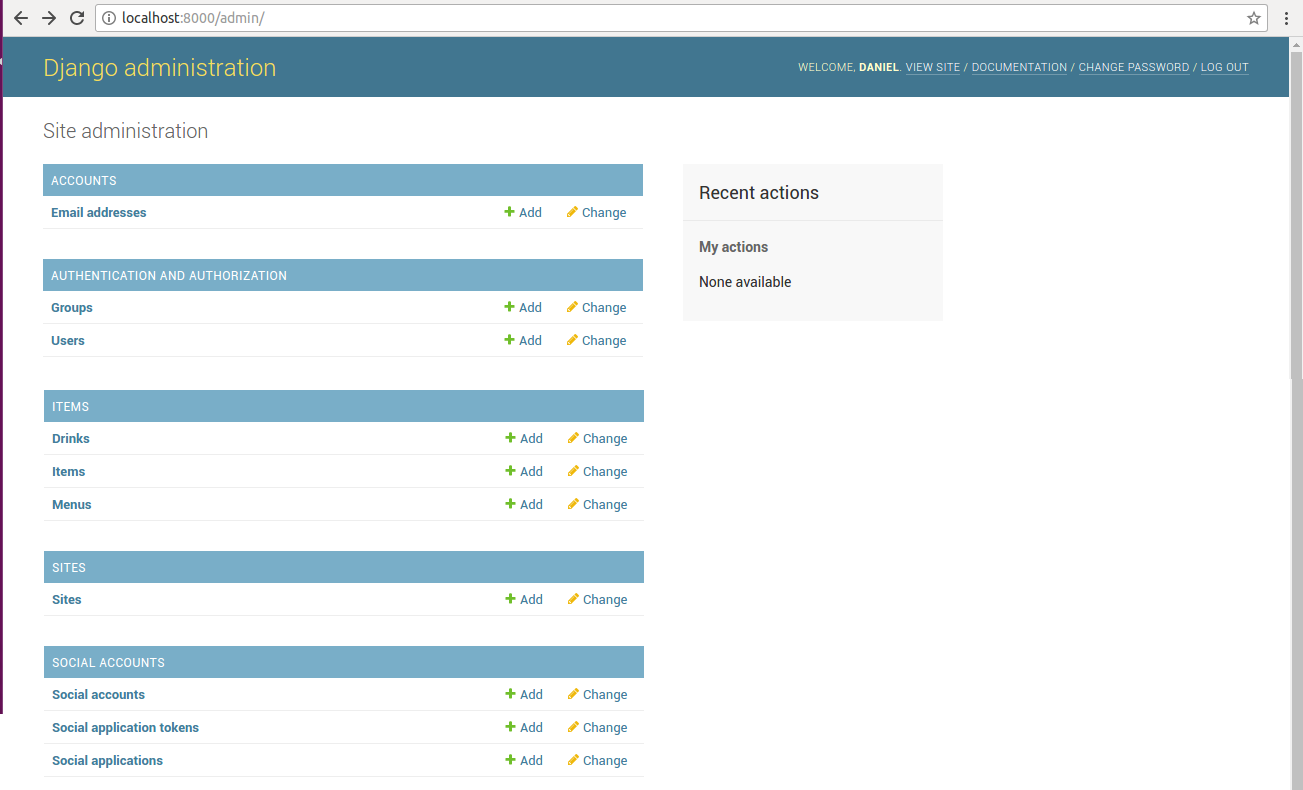
Figure 10-13. Django admin with models for django-allauth
The first Django allauth
inclusion illustrated in figure 10-13 correspond to the 'Accounts'
app which includes the 'Email addresses' model. The 'Email
addresses' model keeps track of emails, their association to user
model records (e.g. django.contrib.auth.models.User),
the primary email status, as well as an email's verification
status. It should be noted 'Email addresses' model records are
stored in the account_emailaddress database table.
It's also worth mentioning that
in figure 10-13 you can see the standard 'User' and 'Group' models
from the django.contrib.auth.models.User package.
Django allauth continues to make use of a project's user model to
store core user data (e.g. passwords)
The second set of Django allauth models included in figure 10-13 correspond to social accounts, which are used to allow Django authentication on social media sites (e.g.Facebook, Google, Twitter), which is the topic of the next and last section in this chapter.