The typical way for Django applications to interact with data is through Django models. A Django model is an object orientated Python class that represents the characteristics of an entity. For example, an entity can be a person, a company, a product or some other concept used by an application.
Because data is at the center of modern applications and the Django framework enforces the DRY (Don't Repeat Yourself) principle, Django models often serve as the building blocks for Django projects. Once you have a set of Django models representing an application's entities, Django models can also serve as the basis to simplify the creation of other Django constructs that operate with data (e.g. forms, class-based views, REST services, Django admin pages), hence the importance of Django models as a whole.
In this chapter you'll learn about the core behaviors of Django models, including how to create models and how to use migrations which are central to working effectively with models. Next, you'll learn about the default behaviors of Django models and how to override them with custom behaviors. In addition, you'll learn about the different data types available to create Django models, the different relationships available for Django models and how to manage database transactions with Django models.
Next, you'll learn more about migration files, including the various ways to create migration files, how to rename migration files, how to squash multiple migration files into a single migration file, the meaning behind each migration file element so you can edit migration files with confidence and the procedure to rollback migration files.
In addition, you'll learn about the various Django tools designed to ease the work between Django models and databases, such backing-up and loading model data with fixture files, including how to load initial data into Django models. Next, you'll learn about Django signals which support the software observer pattern in Django models. Finally, you'll finish the chapter learning how to declare Django models outside of their default location, as well as how to configure multiple databases and use them with Django models.
This chapter assumes you've already set up a database for a Django project. If you haven't set up a database, see Chapter 1 on setting up a database for a Django project.
Django models and the migrations workflow
Django's primary storage technology is relational (i.e. out-of-the-box it can connect to SQLite, Postgres, MySQL or Oracle), so a Django model is designed to map directly to a relational database table. This means instances of a Django model are stored as rows of a relational table named after the model.
For example, for a Django model
class named Store, by default Django performs database
CRUD (Create, Read, Update and Delete) operations on a database
table called <app_name>_store, where each of the
model's Store instances represent database rows and a
model's fields (e.g. name, address,
city, state) map to database table
columns.
Because Django models revolve
around data, they are prone to change. For example, a Django model
named Store can suddenly require the modification of
its original fields due to business requirements (e.g. the addition
of a new field like email or the removal of a field
that's no longer needed like telephone). Maintaining
these Django models changes throughout time is also an important
aspect of Django models and is managed through the use of migration
files.
Create Django models
Django models are stored in
models.py files located inside Django apps. As soon as
you create a Django app, an empty models.py file is
added to the app for future use. If you're unfamiliar with the term
Django app, see the Chapter 1 section on setting up Django content.
Listing 7-1 illustrates a sample Django model definition.
Tip Remember the book's code is at https://github.com/drubio/beginningdjango , if you find it easier to follow along with a pre-typed and structured application.
Listing 7-1 Django model class definition in models.py
from __future__ import unicode_literals
from django.utils.encoding import python_2_unicode_compatible
from django.db import models

@python_2_unicode_compatible
class Store(models.Model):
    #id = models.AutoField(primary_key=True)# Added by default, not required explicitly
    name = models.CharField(max_length=30)
    address = models.CharField(max_length=30)
    city = models.CharField(max_length=30)
    state = models.CharField(max_length=2)
    #objects = models.Manager()# Added by default, to required explicitly
    def __str__(self):
        return "%s (%s,%s)" % (self.name, self.city, self.state)
The first two lines in listing
7-1 import the functionality required to run Python classes in
Django using both Python 2 and Python 3. If your Django project
will just run on Python 3, you can omit these import statements.
The third line in listing 7-1 imports the
django.db.models package which is necessary to access
Django model functionality in the class definition. Next, you can
see the class Store(models.Model) statement. The
@python_2_unicode_compatible annotation is required to
run the class on Python 2, but if you just use Python 3 you can
omit this annotation.
After the main class definition
in listing 7-1, you can see four fields with the
models.CharField data type which qualifies the fields
as character strings. Further restricting the acceptable values for
each field is the max_length argument for
models.CharField (e.g. max_length=30
indicates the maximum length for the character field is 30
characters).
For the moment, don't worry about
the models.CharField field definitions. There are many
other data types and arguments supported by Django's
models package, I'll describe all of these options in
the next section on Django model data types.
In addition, notice the Django
model in listing 7-1 has the id and
objects fields. In this case, I commented them out
with # because you don't need to explicitly declare
them, both are automatically added to all Django models, but I put
them there so you know they exist.
The id field is a
Django AutoField data type, that behind the scenes
creates an integer table column that increments automatically. For
example, when you create the first Store record, the
id field is set to 1 by the database, for the second
Store record the database sets the id
field to 2, and so on. The intent of the id field is
to make record searches easier and more efficient. Because the
id represents a unique number to identify a record,
it's used as a reference, which is also used as a database table's
primary key and as an index to speed up record access. While you
can override various behaviors of this default id
field (e.g. change the field name), I'll leave the details of the id field for a later section and another section on model operations and the importance of the id field.
The objects field is
a Django model's default model manager, charged with managing all
the query operations associated with a Django model. Future
sections in this chapter describe the model manager objects field and the following chapter also describes the use of Django model managers.
Tip If you want to know more about the id field added by default to all Django models: Table 7-1 describes the AutoField data type which is the basis for the id field; the section 'Django model data types' later in this chapter describes the purpose of the primary_key attribute used by the id field; and the save() method described in the 'Model methods' section later in this chapter describes the practical aspects of the id field.
Finally, in listing 7-1 you can
see the class method definition for __str__ which is a
standard Python method -- part of what are called 'magic methods'
-- that are helpful when attempting to view or print instances of
Django models. The __str__ method defines a human
readable representation of a class instance (e.g. a
Store model instance based on listing 7-1 is output by
its name, city and state
field values).
Django model definitions even
when placed in an app's models.py file still aren't
discoverable by Django. In order for Django to discover model
definitions in models.py files, it's necessary to
declare apps as part of the INSTALLED_APPS variable in
settings.py. Listing 7-2 illustrates an
INSTALLED_APPS definition to discover Django models in
the coffeehouse.stores app.
Listing 7-2. Add app to INSTALLED_APPS in Django settings.py to detect models.py definitions
INSTALLED_APPS = (
    'django.contrib.admin',
    'django.contrib.auth',
    'django.contrib.contenttypes',
    'django.contrib.sessions',
    'django.contrib.messages',
    'django.contrib.staticfiles',
    'coffeehouse.stores',
)
As you can see in listing 7-2, in
addition to the default apps declared in
INSTALLED_APPS the coffeehouse.stores app
is added at the end. This tells Django to inspect the
models.py file in the coffeehouse.stores
app to take into account any Django model definitions in it.
After the previous steps, an
app's Django model definitions in models.py are ready
for use. In the next section, I'll describe Django model migrations
and the workflow associated with models in models.py
files.
Migrations and the Django model workflow
Let's start with an illustration of how the Django models workflow operates with migrations thrown into the mix. Figure 7-1 shows the Django models workflow with migrations.
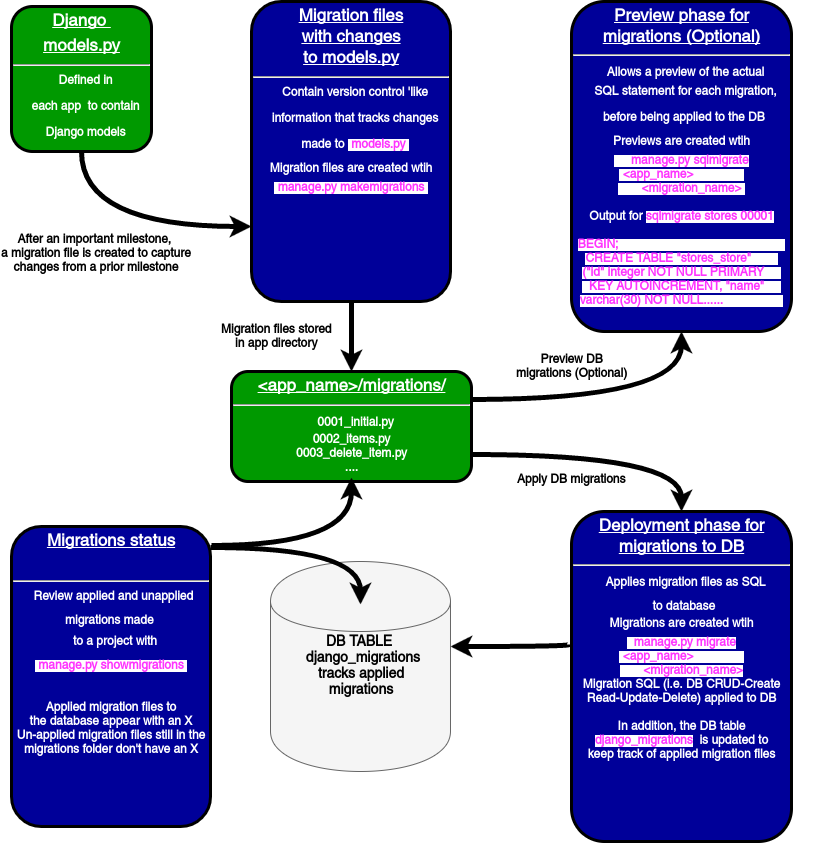
Figure 7-1 Django workflow for models with migrations
Illustrated on the top-left side
of figure 7-1, the workflow starts when you add or modify Django
models on a models.py file. Once you deem the changes
made to a models.py file are considerable or want them
reflected on a database, you need to create a migration file.
Migration files provide a step-by-step snapshot of the changes made
to a models.py file, whether you add, remove or modify
content from the models.py file.
In order to create migration
files you use the makemigrations management command.
When you run this command, Django scans the models.py
files for all Django apps declared in INSTALLED_APPS,
if Django detects a change to a models.py file, it
creates a new migration file for the app. This process functions
like a version control system, where migration files reflect
changes made to models.py from a prior a migration
file, and the entire series of migration files tells the whole
evolution of an app's models.py file.
As you can see in figure 7-1,
migration files are stored in a /migrations/
sub-directory inside an app, alongside the models.py
file they track. And by default, migration files use the naming
convention <number_shortdescription> so it's
easy to track in what order they were created and what it's they
contain.
Next, lets run
makemigrations on the Django model you created in the
last section. Listing 7-3 illustrates this sequence and adds the
stores argument to limit the migration process to the
stores app -- if you run makemigrations
without any argument, Django inspects the models.py
for every app in defined in the INSTALLED_APPS
variable in settings.py.
Listing 7-3. Django makemigrations command to create migration file for changes made to models.py
[user@coffeehouse ~]$ python manage.py makemigrations stores
Migrations for 'stores':
  0001_initial.py:
    - Create model Store
After running
makemigrations stores in listing 7-3, you can see the
migration file 0001_initial.py. The file is given this
name because it's the first migration parting from an empty
models.py. Future changes to the
models.py generate migration files named
0002.,0003...
Turning our attention back the the workflow in figure 7-1, migration files by themselves are just a first step in the Django models workflow. Next, you can either preview or apply these migration files so the models become part of a database.
To preview the actual SQL
statements for a migration before they're applied to a database you
run the sqlmigrate <app_name>
<migration_name> command. Listing 7-4 illustrates the
sqlmigrate sequence for the migration file from the
last step.
Listing 7-4. Django sqlmigrate command to preview SQL generated by migration file
[user@coffeehouse ~]$ python manage.py sqlmigrate stores 0001
BEGIN;
CREATE TABLE "stores_store"
   ("id" integer NOT NULL PRIMARY KEY AUTOINCREMENT,
    "name" varchar(30) NOT NULL,
    "address" varchar(30) NOT NULL,
    "city" varchar(30) NOT NULL,
    "state" varchar(2) NOT NULL);
COMMIT;
As you can see in listing 7-4,
the migration file 0001_initial.py for the
stores app is set to run an SQL statement that creates
a database table named stores_store with field names
that correspond to the Django model from listing 7-1.
Tip You can change a Django model's default database table name with the db_table Meta class option, the 'Model meta class' section describes this in detail.
Previewing the SQL statements generated by a migration file might not seem too exciting at this stage, but it can be very helpful in other circumstances. For example, if you make complex changes to a Django model or your database is relatively large, it's beneficial to preview the SQL before applying the migration file directly to a database.
Finally, the last step in the
workflow for Django models is to apply the migration files to a
database with the migrate command. Listing 7-5 illustrates this
sequence and adds the stores argument to limit the
process to the stores app -- if you run migrate
without any argument, Django processes the migration files for
every app in a project.
Listing 7-5 Django migrate command to execute migration files on database
[user@coffeehouse ~]$ python manage.py migrate stores
Operations to perform:
  Apply all migrations: stores
Running migrations:
  Applying stores.0001_initial... OK
In listing 7-5 the
stores.0001_initial migration is run against the
database. This means the SQL presented in listing 7-4 is executed
against the database.
Caution Be careful manipulating the database directly without applying the same changes via Django migrations, as this can lead to inconsistencies and errors.
Tip If you don't want a Django model to use migrations, you can use the managed Meta class option, see the 'Model meta class' section for details.
To keep track of applied
migrations, on the bottom-left side of figure 7-1 you can see the
use of the showmigrations management command. The
showmigrations command outputs a list of project
migrations, with an X besides those migration files that have been
applied to a database. It's worth mentioning the
showmigrations command obtains its data by inspecting
migration files in migration folders and the
django_migrations database table that keeps track of
applied migrations.