Permission types
By default, permissions in a Django project enforce certain actions. In the previous section, you learned how users can be given the status of superuser, staff & active, all of which are permissions designed to work with the Django admin and the overall access worfklow of a Django project. In addition, you also learned how users or groups can be given the ability to create, delete or update Django model records, all of which are permissions assigned to individual Django models.
In this section, I'll expand on the topic of permissions and describe the default behaviors of permissions, as well as how to create your own permissions for other purposes.
User permissions: Superuser, staff & active
In the previous section, you learned how to assign Django users different sub-types: superuser, staff and active. The following is a list of permissions associated with each of these user sub-types:
- superuser.- Permission to create, read, update and delete users in the Django admin, as well as create, read, update and delete all Django model records in a project through the Django admin.
- staff.- Permission to access the Django admin. Even if a user is marked as a superuser, a user must also be marked as staff to access the Django admin. Users marked as staff must be given additional permissions on each Django model to execute tasks.
- active.-Permission to log-in into the application (Django admin or elsewhere). An inactive user is effectively barred from using his credentials to authenticate into a Django project. For example, in order to access the Django admin a user must be marked as active -- in addition to staff. Also, any section of a Django project (e.g. view or template) can be marked to require active status, forcing users to login.
All three user sub-types are
stored in the database as part of the User model,
sub-types that can be confirmed by using the methods in table 10-2
that belong to the User model. Although
User permissions are heavily used in the Django admin,
this doesn't mean they're restricted to it. For example, it's
possible to rely on a User permissions like superuser,
staff or active to allow or deny access to other parts of a Django
project (e.g. a link in a template, a url/view method or others
actions).
The next section on permission enforcement describes these processes in detail. Next, I'll describe another type of permissions which is associated with Django models.
Model permissions: add, change, delete & custom
Model permissions are linked to
the ability to create, delete or update Django model records. In
the first section of this chapter, you can see in figure 10-5 a
selection grid to assign add, change and
delete permissions on individual models to each user
in a Django project. And in figure 10-8, you can see an equivalent
selection grid to assign these same type of add,
change and delete permissions on
individual models the each group in a Django project.
These add,
change and delete permissions are managed
at the database level through permission model records, records
which are automatically created when you run a Django model's first
migration. Managing these type of permissions once they're created
is very straightforward, as the assignment is made directly on a
user -- illustrated in figure 10-5 -- or group illustrated in figure 10-8.
Tip Model permission data is stored in the database table auth_permission, which also references the django_content_type table that maintains a list of installed Django models. In addition, model permission-user relationships are stored in the database table auth_user_user_permissions and model permission-group relationships are stored in the database table auth_group_permissions.
Similar to the behavior of user
permissions, model permissions aren't necessarily restricted to
model operations. For example, it's perfectly possible to allow or
deny access to a view or a template section if a user or group has
a certain model permission (e.g. if a User has the
ability to create a Store model or change an
Item model, allow access to a page or link).
But again, the next section on permission enforcement describes these processes in detail. Next, I'll describe how to customize model permissions for Django models.
Model Meta permission options: default_permissions and permissions
Sometimes the need can arise to
change the default permissions given to a model. By default, all
Django models are given the add, change
and delete permissions. Although it's up to an
administrator to grant these permissions to users and groups,
sometimes it can be necessary to eliminate some or all of these
permissions from a Django model (e.g. eliminate the presence of the
change and delete permissions from a
data-sensitive model).
In addition, sometimes it can
also be necessary to add custom permissions to a model that doesn't
fit the default add, change and
delete permissions (e.g. permissions such
give_refund or can_hire, to assign
users/groups permissions to access certain parts of an
application).
To alter the default permissions
given to model (i.e. add, change and
delete), you can use a model's meta class
default_permissions field. In addition, you can add
custom permissions to a model permissions through a model's meta
class permissions field.
Listing 10-4 illustrates a model
class that makes use of the model meta permissions and
default_permissions fields.
Listing 10-4. Customize a Django model's permissions with default_permissions and permissions
class Store(models.Model):
    name = models.CharField(max_length=30)
    address = models.CharField(max_length=30,unique=True)
    city = models.CharField(max_length=30)
    state = models.CharField(max_length=2)
    class Meta:
        default_permissions = ('add',)
        permissions = (('give_refund','Can refund customers'),('can_hire','Can hire employees'))
Notice in listing 10-4 the
Store model's default_permissions field
is set to ('add',) which effectively removes the
change and delete permissions. If you add
this model meta statement, you'll notice the Store
model's default permissions change, as illustrated in the UI figure 10-10.
In addition, in listing 10-4
notice the model meta permissions field sets two custom
permissions: give_refund and can_hire,
where each custom permission is composed of a tuple with the first
element representing the code -- used in the database -- and the
second element a friendly UI name. If you add this model meta
statement, you'll notice the Store model adds these
two custom permissions, as illustrated in the UI figure 10-10.
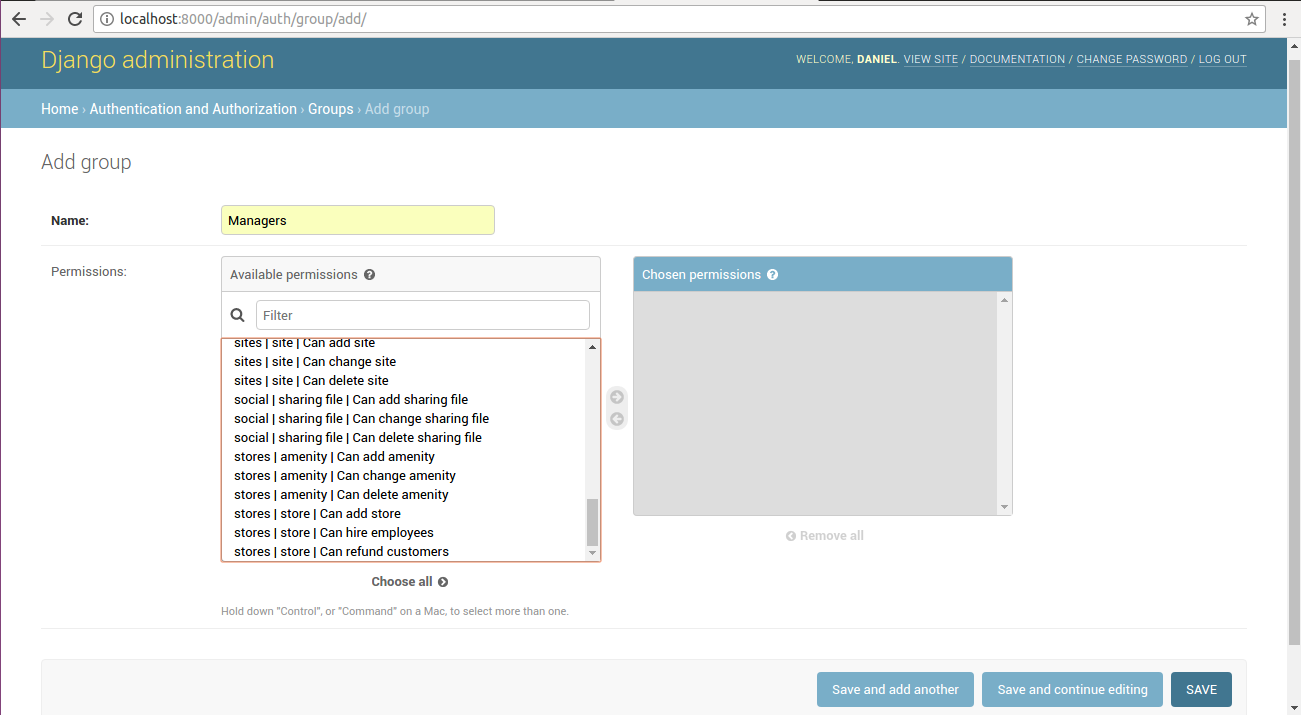
Figure 10-10 Custom default model permissions and custom model permissions
Permission checks and enforcement
Now that you know about the different types of Django permissions, we can explore how to leverage these permissions outside out of their primary context (i.e. user permissions outside the Django admin and model permissions outside of Django CRUD operations).
Up next, you'll learn how to change and enforce Django permissions in views, urls, templates, models and class-based views.
View method permission checks
Because view methods process
incoming requests and dispatch responses to end users, they
represent an ideal location to enforce permission checks. For
example, you can use a permission check on a view method to return
different content, depending if a user is logged-in (i.e. is a
User vs. an AnonymousUser) or is a
superuser, staff or active sub-type.
Listing 10-5 illustrates a permission check inside the logic of a view method to return different results based on a user's log-in status, as well as another variation that uses a decorator to restrict view method access based on a user's log-in status.
Listing 10-5. Permission check in view methods with internal checks and @login_required
# Internal check to see if user is anonymous or not
def homepage(request):
    if request.user.is_anonymous():
        # Logic for AnonymousUser
    else:
        # Logic for User

# Method check to see if user is logged in or not (i.e. a User)
from django.contrib.auth.decorators import login_required

@login_required
def profile(request):
    # Logic for profile
Note TheUsermodel is available on all view method requests (e.g.request.user) thanks to Django'sAuthenticationMiddlewarewhich is enabled by default. See Chapter 2 for additional details on Django middleware.
The first example in listing 10-5
uses the is_anonymous() method available on all
User models -- described in table 10-2. If this last
method determines the user making the request is anonymous --
meaning he hasn't logged-in -- a certain course of action and
response is taken. On the other hand, if the
is_anonymous() method determines the user making the
request is logged-in, another course of action and response is
taken.
Tip You can use any User model field or method -- in table 10-1 or table 10-2 -- beside the is_anonymous method to perform a check (e.g.is_staff, is_superuser).
The second example in listing
10-5 uses the @login_required() decorator to restrict
to entire view method to logged-in users (i.e. requests that have
User and blocks requests with
AnonymousUser). This last technique is helpful when
know beforehand the view method doesn't require a conditional
permission workflow like the first example in listing 10-5.
Permissions checks on view
methods can also be performed to verify if a user complies with a
certain permission test. For example, a view method can be blocked
to users that belong to a certain group or to users that have certain model permissions. Listing 10-6 illustrates
three additional view method permission checks using the
@user_passes_test and
@permission_required decorators.
Listing 10-6. Permission check in view methods with @user_passes_test and @permission_required
# Method check to see if User belongs to group called 'Barista'
from django.contrib.auth.decorators import user_passes_test
from django.contrib.auth.models import Group

@user_passes_test(lambda u: Group.objects.get(name='Baristas') in u.groups.all())
def dashboard(request):
    # Logic for dashboard

# Explicit method check, if User is authenticated and has permissions to change Store model
# Explicit method with test
def user_of_stores(user):
    if user.is_authenticated() and user.has_perm("stores.change_store"):
        return True
    else:
        return False

# Method check using method
@user_passes_test(user_of_stores)
def store_manager(request):
    # Logic for store_manager

# Method check to see if User has permissions to add Store model
from django.contrib.auth.decorators import permission_required

@permission_required('stores.add_store')
def store_creator(request):
    # Logic for store_creator
The first example in listing 10-6
uses the @user_passes_test decorator and defines an
in-line test. The snippet lambda u:
Group.objects.get(name='Baristas') in u.groups.all() fetches
the Group model record with the name
Baristas and checks if the requesting user belongs to
this group. If the requesting user does not belong to the
Baristas group then the test fails and access is
denied, otherwise the user is allowed run through the view
method.
The second example also uses the
@user_passes_test decorator, but instead of defining
an inline test it relies on the user_of_stores()
method to perform the test logic. This is particularly helpful if
the test is complex, which can make it hard to follow inline logic,
compared to having a regular method. As you can also see in listing
10-6, the user_of_stores() verifies if the user is
authenticated and also if he has update permissions on the
Store model -- note the string
stores.change_store is the syntax used by Django's
Permission model records.
The last example in listing 10-6
uses the @permission_required decorator which is
designed to validate if a user has a given Permission
record. In this case, notice the decorator has the input string
stores.add_store which indicates that only users that
have permission to add a Store model can run through
the view method.
For internal validation checks (e.g. those made in the body of a method, such as:
if request.user.is_anonymous():) you have absolute control, so you can redirect a user to any page or add flash messages to display on a template. For the decorator validation checks@login_required,@user_passes_testand@permission_requiredthe default failure behavior is to redirect a user to Django's login page. Django's default login page url is/account/login/, a value that can be overridden with theLOGIN_URLvariable insettings.py, details of which I'll provide in an upcoming section.For the
@permission_requireddecorator, it's also possible to redirect a failed test to Django's HTTP 403 (Forbidden) page by adding theraise_exception=Trueattribute (e.g.@permission_required('stores.add_store',raise_exception=True)).
Url permission checks
In certain circumstances you can
have a Djano workflow that doesn't involve a view method and simply
sends control from a url directly to a static template. In such
cases, it's also possible to enforce permission checks directly on
url definitions. Listing 10-7 illustrates similar validation checks
like the ones in listings 10-5 and 10-6 applied to url definitions
in urls.py.
Listing 10-7. Permission checks in urls.py for static templates
from django.conf.urls import  include, url
from django.views.generic import TemplateView
from django.contrib.auth.decorators import login_required,permission_required,user_passes_test
from django.contrib.auth.models import Group

urlpatterns = [
      url(r'^online/baristas/',
         user_passes_test(lambda u: Group.objects.get(name='Baristas') in u.groups.all())
         (TemplateView.as_view(template_name='online/baristas.html')),name="onlinebaristas"),
      url(r'^online/dashboard/',
         permission_required('stores.add_store')
         (TemplateView.as_view(template_name='online/dashboard.html')),name="onlinedashboard"),
      url(r'^online/',
         login_required(TemplateView.as_view(template_name='online/index.html')),name='online'),
]
As you can see in listing 10-7,
after you import the required decorators you just need to integrate
the validation tests in the url definition. The
@user_passes_test and
@permission_required decorators are declared as
standalone methods followed by the url definition (e.g.
user_pass_test()(TemplateView.as_view...)). The
@login_required decorator though takes the
TemplateView statement as its input. It should be
pointed out the behavior for failed tests in listing 10-7 is the
same as those in listing 10-6 and listing 10-6, described in the sidebar
'What happens when a user fails a permission check ?'
Another possibility that can
arise for validation checks is to perform them on a group of view
methods/urls, so that instead of adding a decorator to each
individual view method -- as illustrated in listing 10-6 -- you
only do it once for a whole group. This view method/url grouping
process is particularly common when defining urls in
urls.py through the include() method.
Listing 10-8 illustrates how to enforce validation checks on sets
of urls that use the include() method.
Listing 10-8. Permission checks in urls.py for include() definitions
from django.conf.urls import include, url
from django.core.urlresolvers import RegexURLResolver, RegexURLPattern

class DecoratedURLPattern(RegexURLPattern):
    def resolve(self, *args, **kwargs):
        result = super(DecoratedURLPattern, self).resolve(*args, **kwargs)
        if result:
            result.func = self._decorate_with(result.func)
        return result

class DecoratedRegexURLResolver(RegexURLResolver):
    def resolve(self, *args, **kwargs):
        result = super(DecoratedRegexURLResolver, self).resolve(*args, **kwargs)
        if result:
            result.func = self._decorate_with(result.func)
        return result

def decorated_includes(func, includes, *args, **kwargs):
    urlconf_module, app_name, namespace = includes
    patterns = getattr(urlconf_module, 'urlpatterns', urlconf_module)
    for item in patterns:
        if isinstance(item, RegexURLPattern):
            item.__class__ = DecoratedURLPattern
            item._decorate_with = func

        elif isinstance(item, RegexURLResolver):
            item.__class__ = DecoratedRegexURLResolver
            item._decorate_with = func
    return urlconf_module, app_name, namespace

from django.contrib.auth.decorators import login_required,permission_required,user_passes_test
from django.contrib.auth.models import Group
from coffeehouse.items.urls import urlpatterns as drinks_url_patterns

urlpatterns = [
    url(r'^items/',
       decorated_includes(login_required,include(items_url_patterns,namespace="items"))),
    url(r'^stores/',
      decorated_includes(permission_required('stores.add_store'),
      include('coffeehouse.stores.urls',namespace="stores"))),
    url(r'^social/',
      decorated_includes(user_passes_test(lambda u: Group.objects.get(name='Baristas') in u.groups.all()),
      include('coffeehouse.social.urls',namespace="social"))),
]
Because Django doesn't have
built-in support for permissions checks in include()
definitions, you can see in listing 10-8 we first define two custom
classes followed by the custom method
decorated_includes. If you follow the sequence in
listing 10-8, you can see the decorated_includes()
method accepts two input arguments, first the permission test
(e.g.login_required, permission_required)
and then the standard include() method with the url
definitions. It should also be pointed out the behavior for failed
tests in listing 10-8 is the same as those in previous listings,
described in the sidebar 'What happens when a user fails a
permission check ?'
Template permission checks
Another permission check available in Django projects is in templates, a process that's helpful if you want to show/hide content (e.g. links) based on a user's permissions. Listing 10-9 illustrates a series of Django template syntax examples.
Listing 10-9. Permission checks in templates
       {% if user.is_authenticated %}
          {#  Content for authenticated users  #}
       {% endif %}

       {% if perms.stores.add_store %}
          {#  Content for users that can add stores #}
       {% endif %}

       {% for group in user.groups.all %}
          {% if group.name == 'Baristas'  %}
               {# Content for users with 'Baristas' group #}
          {% endif %}
       {% endfor %}
Note Theuserandpermsvariables used to perform permissions checks in templates are available thanks to Django'sauthcontext processor which is enabled by default -- see the Chapter 3 details on the use Django context processors.
You can see in listing 10-9 all
of the template syntax examples use the user and
perms variables to perform a conditional permission
check. The first example checks to see if the user is authenticated
through is_authenticated. The second example verifies
if perms -- which holds a user's permissions -- has
access to create Store model records, using Django's
Permission syntax stores.add_store. And the third
example in listing 10-9 loops over a user's groups, to check if
the user is in the Baristas group, if it's, it outputs
content for this type of user.
Tip Loops in Django templates to check a property are very inefficient. Although the last example in listing 10-9 works, it's a very inefficient mechanism. A better solution is to create a custom filter and perform a direct query in the filter (e.g. {% if user|has_group:"Baristas" %}, with thehas_groupfilter containing the bulk of the logic check). In this case I opted for the syntax in listing 10-9 to keep everything in one place, but be aware the more efficient solution for this type of logic is to use a custom filter described in Chapter 3.
Class-based view permission checks
As you learned toward the end of Chapter 2 and in Chapter 9, class-based views provide better re-usability and encapsulation for the logic contained in view methods. However, due to the way class-based views are composed, they require a different approach to check permissions than regular view methods presented in listing 10-6 and listing 10-6.
Although you can technically
check permissions in class-based views -- just like it's done in
standard view methods -- by defining a class-based view's
get() and/or post() methods, this
technique also forces you to declare the bulk of a view's logic,
which is inefficient in a class-based view if all you're trying to
do in incorporate permission checks.
Listing 10-10 illustrates as series of option to perform permission checks in class-based views.
Listing 10-10. Permission checks in class-based views
from django.views.generic import ListView
from django.views.generic.detail import DetailView
from django.views.generic.edit import CreateView, UpdateView, DeleteView
from django.utils.decorators import method_decorator
from django.core.urlresolvers import reverse_lazy
from django.contrib.messages.views import SuccessMessageMixin
from django.contrib.auth.decorators import login_required,user_passes_test
from django.contrib.auth.models import Group
from django.contrib.auth.mixins import LoginRequiredMixin, UserPassesTestMixin, PermissionRequiredMixin

class ItemList(LoginRequiredMixin,ListView):
    model = Item
    context_object_name = 'items'
    template_name = 'items/index.html'

class ItemDetail(UserPassesTestMixin,DetailView):
    model = Item
    pk_url_kwarg = 'item_id'
    template_name = 'items/detail.html'
    def test_func(self):
        return self.request.user.is_authenticated

class ItemCreation(PermissionRequiredMixin,SuccessMessageMixin,CreateView):
    model = Item
    form_class = ItemForm
    success_url = reverse_lazy('items:index')
    success_message = "Item %(name)s created successfully"
    permission_required = ('items.add_item',)

@method_decorator(login_required, name='dispatch')
class ItemUpdate(SuccessMessageMixin,UpdateView):
    model = Item
    pk_url_kwarg = 'item_id'
    form_class = ItemForm
    success_url = reverse_lazy('items:index')
    success_message = "Item %(name)s updated successfully"

@method_decorator(user_passes_test(lambda u: Group.objects.get(name='Baristas') in u.groups.all()),
                  name='dispatch')
class ItemDelete(DeleteView):
    model = Item
    pk_url_kwarg = 'item_id'
    success_url = reverse_lazy('items:index')
The first class-based view in
listing 10-10 ItemList uses the
LoginRequiredMixin mixin to enforce only logged-in
users are able to access the class-based view. The second
class-based view ItemDetail uses another mixin named
UserPassesTestMixin to ensure that only users that
pass a permission test are allowed to access the class-based view.
To define a permission test for a class-based view that uses the
UserPassesTestMixin mixin, notice the
test_func() method is used. This last method gains
access to a user -- via self.request -- and returns a
True or False value based on the test,
which in listing 10-10 consists of simply calling
is_authenticated.
The third class-based view in
listing 10-10 ItemCreation uses the
PermissionRequiredMixin mixin to enforce only users
that have certain model permissions are allowed access to the
class-based view. To declare model permissions on a class-based
view that uses the PermissionRequiredMixin mixin, the
permission_required option is used with a tuple value
of permissions. In the case of listing 10-10, the
('items.add_item',) value follows the model permission
syntax <app_name>.<app_permission>,
ensuring only users that have permission to add Item
records to the items app are allowed access the
class-based view.
The last two class-based views in
listing 10-10 ItemUpdate and ItemDelete
make use of the @method_decorator decorator to enforce
class-based permissions. The @method_decorator
decorator is specifically designed to apply standard view method
decorators -- like the ones used in listing 10-5 and listing 10-6 -- to
class-based view methods, accepting two arguments: a decorator and
the class-based view method on which to apply the decorator. In the
case of listing 10-10, you can see the ItemUpdate
class-based view applies the login_required decorator
to the dispatch() method to only allow logged in users
to access the class-based view. And the ItemDelete
class-based view applies the user_passes_test
decorator to the dispatch() method to only allow users
that belong to the Baristas group access to the
class-based view.