Set up Django on a WSGI/ASGI server
In order to deploy a Django project to the real world, you'll need to set it up to work on an WSGI/ASGI server. A WSGI/ASGI server is a piece of software designed to run Python applications in a web environment.
Although there are various WSGI/ASGI servers and architectures you can choose from -- of which I'll describe the most common options -- the principle of all WSGI/ASGI servers is to efficiently handle requests from end user's browsers and execute the underlying Python/Django workflow returning the appropriate response.
The inner workings of Django's built-in server: python manage.py runserver
Up to this point, the way to access Django projects has been through Django's built-in server command python manage.py runserver, which effectively allows visitors to access a Django project through a browser.
While there's nothing inherently wrong with python manage.py runserver, it's not designed to deal with the potential demands and threats that are common in real world web environments.
That said, let's take a closer look at a request/response workflow for Django's python manage.py runserver to better understand its limitations, as well as set the foundations to understand the various parameters and architectures that are used with WSGI/ASGI servers.
Listing 5-10 illustrates the log output produced by python manage.py runserver when a single user attempts to access the Django admin main page (i.e./admin/ url). Each line in listing 5-10 represents a request/response generated by Django's built-in server, where each line follows the pattern: [Timestamp] "(HTTP method) (URL request path) (HTTP version)" (HTTP Status Code) (# of bytes in response)
Listing 5-10. Request/response workflow for Django's python manage.py runserver
$ python manage.py runserver
System check identified no issues (0 silenced).
Django version 4.0.1, using settings 'coffeehouse.testing_settings'
Starting development server at http://127.0.0.1:8000/
[11/Apr 17:36:31] "GET /admin/ HTTP/1.1" 302 0
[11/Apr 17:36:31] "GET /admin/login/?next=/admin/ HTTP/1.1" 200 2215
[11/Apr 17:36:31] "GET /static/admin/css/base.css HTTP/1.1" 200 19513
[11/Apr 17:36:31] "GET /static/admin/css/login.css HTTP/1.1" 200 954
[11/Apr 17:36:31] "GET /static/admin/css/nav_sidebar.css HTTP/1.1" 200 2616
[11/Apr 17:36:31] "GET /static/admin/js/nav_sidebar.js HTTP/1.1" 200 3401
[11/Apr 17:36:31] "GET /static/admin/css/responsive.css HTTP/1.1" 200 18545
[11/Apr 17:36:31] "GET /static/admin/css/fonts.css HTTP/1.1" 200 423
[11/Apr 17:36:31] "GET /static/admin/fonts/Roboto-Light-webfont.woff HTTP/1.1" 200 85692
[11/Apr 17:36:31] "GET /static/admin/fonts/Roboto-Regular-webfont.woff HTTP/1.1" 200 85876
[11/Apr 17:36:36] "POST /admin/login/?next=/admin/ HTTP/1.1" 302 0
[11/Apr 17:36:36] "GET /admin/ HTTP/1.1" 200 3414
[11/Apr 17:36:36] "GET /static/admin/css/dashboard.css HTTP/1.1" 200 380
[11/Apr 17:36:36] "GET /static/admin/img/icon-changelink.svg HTTP/1.1" 200 380
[11/Apr 17:36:36] "GET /static/admin/img/icon-addlink.svg HTTP/1.1" 200 331
[11/Apr 17:36:36] "GET /static/admin/fonts/Roboto-Bold-webfont.woff HTTP/1.1" 200 86184
The most important aspect in listing 5-10 is there are only two timestamps -- [11/Apr 17:36:31] and [11/Apr 17:36:36] -- and over a dozen requests/responses. Ten requests/responses occurring at the 31st second and six occurring at the 36th second, with all requests/responses generated for a single user.
The first set of requests/responses tagged with the [11/Apr 17:36:31] timestamp, represent end user requests/responses for the /admin/ URL. Because the user is logged out, the first request "GET /admin/ HTTP/1.1" 302 0 indicates a redirect (HTTP 302 status code) with 0 response bytes, to the /admin/login/?next=/admin/ URL -- which is the admin login page -- that returns a success response (HTTP 200 status code) with 2215 response bytes. In addition, the remaining eight requests/responses at 17:36:31 are all for static resources (e.g. Cascading Style Sheets [.css], JavaScript [.js]) under the static URL, required by the page generated at the /admin/login/ URL.
The second set of requests/responses tagged with the [11/Apr 17:36:36] timestamp, represent end user requests/responses to login at the /admin/login/ URL. Because the user is submitting credentials, the first request "POST /admin/login/?next=/admin/ HTTP/1.1" 302 0 is an HTTP POST method that redirects (HTTP 302 status code) with 0 response bytes, to the /admin/ URL -- which is the main admin page -- that returns a success response (HTTP 200 status code) with 3414 response bytes. In addition, the remaining four requests/responses at 17:36:36 are all for static resources (e.g. Cascading Style Sheets [.css], JavaScript [.js]) under the static URL, required by the page generated at the /admin/ URL.
The main takeaways from listing 5-10 are:
- There are only four URL requests/responses that are backed by Python/Django. Two of them redirects -- which require little work -- and two that actually require Python processing.
- The remaining twelve URL requests/responses are for static resources, that is, files that require no Python processing at all.
- Only a single operating system(OS) process is used by Django's server to attend all requests/responses.
This handling of both static and Python backed requests/responses by Django's built-in server is done for the sake of simplicity. Similarly, to simplify its use and setup, Django's built-in server lacks most of the scalability and security features needed by real world web applications, in other words, with Django's built-in server there's no need to configure anything or calibrate resources to match user demand.
With an understanding of how Django's python manage.py runserver is designed with simplicity in mind, let's explore some real processing requirements for web applications so you gain a better understanding of what you'll need to deal with when working with WSGI/ASGI servers.
The ABCs of processing web requests/responses
There are two broad types of web requests/responses, depending on how the information they generate is backed:
- Static.- Where a request is made for information that's the same for all users and therefore a response consists of reading the contents of a file and sending it out to the requesting user.
- Dynamic.- Where a request is made for information that's personalized on a per request basis and therefore a response consists of executing a program to generate personalized content for each requesting user.
Attending dynamically backed web requests/responses requires more time and resources vs. attending statically backed web requests/responses. For this reason, it's considered a best practice to attend statically backed requests/responses separately from dynamically backed requests/responses. You can of course attend statically backed requests/responses with the same dynamically backed pipeline -- like Django's built-in server python manage.py runserver -- but it's simply wasteful to use a Python powered process to serve static information that doesn't need it. In addition, given the nature of static web requests/responses, it's also convenient to use this separation for static web requests/responses to allow advanced static scaling architectures (e.g. CDN [ Content Delivery Network], caching).
Django is inclusively designed to enforce this separation between statically and dynamically backed information, but more details on this are provided in the upcoming section Set up static web page resources -- Images, CSS, JavaScript -- in Django.
Another important aspect of web requests/responses is the amount that can be realistically processed at any given time. In listing 5-10, you can see how a single user can easily generate multiple requests/responses per second. In a real world Django application with hundreds of users, you can easily have dozens or hundreds of web requests/responses per second.
Since computing processes are prone to running out of resources, keeping busy, crashing and other sorts of uncontrollable behaviors, it's simply not a realistic solution to attend dozens or hundreds of web requests/responses per second with a single OS process -- like Django's built-in server python manage.py runserver. To solve this problem, a WSGI/ASGI server uses various strategies to handle larger demands, which include: multiple processes, self-healing processes, as well the ability to use multiple threads in a single process to handle an even greater amount of web requests/responses. As we move forward into specific WSGI/ASGI server configurations, these strategies are discussed in greater detail.
The need for WSGI servers, ASGI servers & different deployment architectures
To understand where WSGI & ASGI servers fit in the grand scheme of processing web requests/responses, it's necessary to take a few steps back at how web processing began.
At the dawn of the web, there was just the need to handle static web requests/responses. The piece of software designed to handle this was simply called a web server, of which there are still many in wide use today (e.g. Apache, Nginx), albeit their core functionality today is often abstracted away in turn key services (e.g. AWS S3, Google Cloud Storage).
As the need for dynamic web requests/responses started to appear, web servers started to support standards to create dynamic content generated from different programming languages. CGI or 'Common Gateway Interface' was the first approach -- dating back to 1993 -- which allowed a programming language environment (e.g. Python or other) to run application code on behalf of a web server. CGI being the first such approach, was very inefficient and insecure, since it spawned a standalone and heavyweight programming language environment alongside a web server. Next, FastCGI appeared as an improved version of CGI -- hence the preceding 'Fast' in its name -- but which nevertheless still provided sub-optimal conditions to execute dynamically backed web requests/responses.
With CGI and FastCGI being general purpose solutions to support dynamic web requests/responses for all programming languages (e.g. Java, PHP), Python specific solutions started to appear in the form of web server modules. Web server modules allowed programming language environments to run embedded as part of a web server's process, addressing the shortcomings of CGI/FastCGI, keeping the programming language environment closer to the web serving process and making dynamic web requests/responses run faster than traditional CGI/FastCGI. One of the first modules was Apache's mod_python that embedded a Python interpreter into the Apache web server, however, with mod_python being an ad-hoc Apache solution and not sanctioned by the Python community as a whole, it failed to garner widespread adoption.
It was left to WSGI (Web Server Gateway Interface) -- in the form of PEP-3333[3] -- to become the standard set forth by the Python language to promote common ground for portable communication between Python applications and web servers. What WSGI guarantees is that any Python application irrespective of framework -- Django or other -- just has to align itself with the WSGI standard to be able to work with any WSGI compliant server.
Along the same lines, ASGI (Asynchronous Server Gateway Interface) became the standard[4] to promote common ground for portable communication between async Python applications and web servers. What ASGI guarantees is that any async Python application irrespective of framework -- Django or other -- just has to align itself with the ASGI standard to be able to work with any ASGI compliant server.
Tip All Django applications are equipped to run on WSGI & ASGI servers, via thewsgi.pyandasgi.pyscripts in each project. Additional details and differences are provided in the next section on ASGI setup.
With both WSGI & ASGI being standards, it means there are many options to choose from to run Django applications. In principle, all WSGI/ASGI servers achieve the same end result, which is to serve a Python/Django application to the public, however, where they start to differ is in the amount of features, updates and architectures they support. To understand different WSGI/ASGI deployment architectures, it's important to understand the different expectations people and organizations have with respect to availability and maintainability of web applications, as well as the fuzzy boundaries that now exist between plain web servers -- designed to attend static web requests/responses -- and WSGI/ASGI servers (a.k.a. app servers) designed to attend dynamic web requests/responses bound to Python backed apllications.
The technology needs for a locally & family owned coffeehouse can be very different to those of an international & franchised coffeehouse. The first one is unlikely to be affected if its web application goes offline for a couple of days, however, the second one is more likely to face considerable losses if its web operations are interrupted, given its wider geographical reach. Similarly, a small coffeehouse is likely to update its web application every month or year -- if ever -- while a larger coffeehouse is more likely to update its web applications every week or day. Such requirements influence whether you can make due with a $5 month server and not lose sleep over web operational concerns or if you need to invest in a more sophisticated deployment architecture with CI/CD (Continuous integration/continuous delivery) and be prone to security attacks that only medium to large online business worry about (e.g. Denial-of-service [DoS] attacks).
Irrespective of the web needs of a particular business, the amount of security vulnerabilities and user demand placed on today's web bound software can be overwhelming. For this reason, it's a common practice to separate the work done by web servers and app servers. With plain web servers focusing on handling massive amounts of web requests/responses and dealing with the most obscure security vulnerabilities on the web, while app servers focusing on efficiently handling web requests/responses for a given programming language, which for Python/Django backed applications means through WSGI/ASGI app servers. Although as you'll learn shortly, it's entirely possible to use a unified web server/app server deployment architecture for simplicity or budget sake.
Finally, one more decision that will affect your selection of deployment architecture is your application's Python & Django development paradigm. In the Python & Django world there are two paradigms to develop applications: the classical way (a.k.a. synchronous) which requires the use of a WSGI server and a more novel way (a.k.a. asynchronous) that requires the use of an ASGI server. The chapter on Django async applications discusses these design differences in greater detail and the later section discusses ASGI app server deployment.
Most common Django deployment setup: A proxy web server with a WSGI app server
The most common practices to deploy a Django application is to proxy all requests/responses through a plain web server -- to take advantage of its strengths -- and then leverage a WSGI server to perform the heavy-lifting Python processing, taking advantage of its strengths. Figure 5-1 illustrates this deployment architecture.
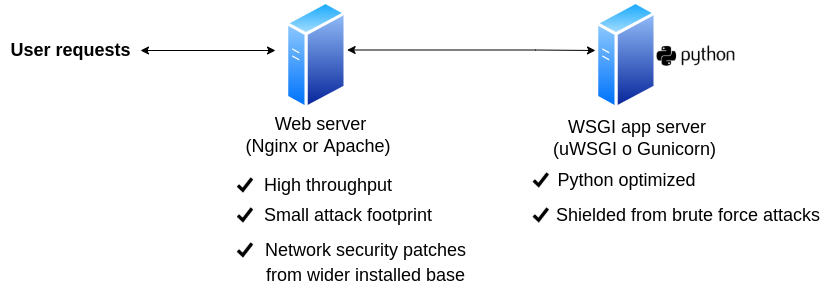
Figure 5-1. Web server proxy in front of WSGI server
As shown in figure 5-1, web requests/responses are funneled through a plain web server (e.g. Nginx) and then Python/Django backed requests are sent to a WSGI server (e.g. uWSGI) to generate the proper responses.
Using a plain web server as the first contact point and proxy for a web application has several advantages. A plain web server is designed to do just one thing well, dispatch all types of web requests/responses as efficiently as possible, leading to high throughput. With its limited scope, a web server's security attack footprint is also very small, so there's less to worry about in terms of programming language security vulnerabilities or such things. In addition, given a plain web server's use across a myriad of applications written in different programming languages, this also means a wider installed base and more user communities on the lookout for web security vulnerabilities.
In the case of a WSGI server to process Python/Django requests/responses, the main advantage of having it behind a proxy is it's shielded from brute force security attacks from the wider Internet, since it can be configured to only listen for requests from the proxy. In addition, a WSGI server has all kinds of features to support Python-specific processing requirements (e.g. processes, threads) and as such is optimized to deal with most issues in Python backed application processes.
Now let's take a look at how to set up the Nginx web server[5] as a proxy with the uWSGI app server[6], the last of which is one of the most populare WSGI servers.
This section's remaining content for Django 4.0 is only available with a subscription.
Bare-bones WSGI setup: All-in-one server
The previous and most common Django deployment architecture begs the question, is it really necessary to use both a web server proxy and WSGI server to deploy a Django applications to the real world ? Strictly speaking, no, even though I and WSGI server makers would strongly recommend it.
If you feel its too much work to run both a web server proxy and WSGI server, your hosting provider imposes limits on what you can run, or you simply don't feel your small Django site warrants the need to use both, you can enable a standalone web server to work as a WSGI server, while you can also enable a WSGI server to directly handle HTTP traffic from the wider Internet. Figure 5-2 illustrates this deployment architecture.
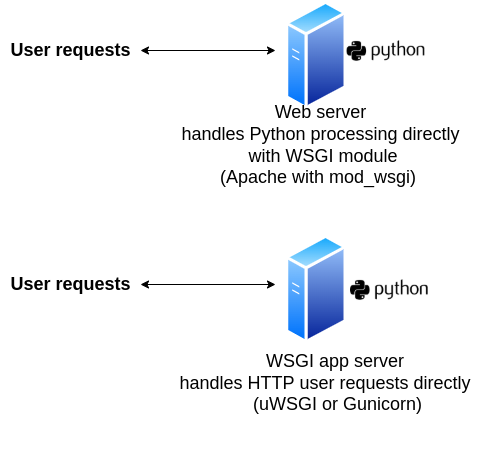
Figure 5-2. Web server with WSGI module & WSGI server with HTTP enabled
As shown in figure 5-2, there are two options to set up an all-in-one server. Option one is to enable a web server like Apache[7] with its built-in WSGI module to take care of the Python/Django processing, as well as its web serving functionlity. Option two is to enable a WSGI app server like Gunicorn[8] to directly attend all HTTP web requests/responses, as well as its Python/Django processing functionality.
Although this set up can appear much simpler than the earlier one presented in figure 5-1, a quick analysis of both figures should remind you why the set up in figure 5-2 should only be used for small deployments or when you're limited by a hosting provider. The problem with using an all-in-one server set up like those presented in figure 5-2 is it can open an application to performance and security flaws due to over-leveraging software that's not intended for multiple purposes. For example, although the Apache web server is a widely used web server, its WSGI implementation (i.e. mod_wsgi module) isn't necessarily the most widely used or sophisticated WSGI app server, therefore it can lack many features available in other WSGI app servers like uWSGI or Gunicorn. Similarly, although Gunicorn is a widely used WSGI app server, it being used to also handle HTTP requests from the wider Internet directly can make it subject to obscure security attacks for which it was never designed or tested against.
Due to the more limited use of this Django deployment architecture, I'll briefly describe the set up details for some of the more popular choices that support it.
The Apache web server can support WSGI through its module mod_wsgi[9] module. The Apache mod_wsgi module has a long history (note some of the security issues) dating back to Python 2.x versions and was developed when WSGI became a standard to supplant the older Apache mod_python module mentioned earlier when describing CGI/FastCGI.
As of 2022, the Apache mod_wsgi module is still actively developed, albeit by a single person, who has a done a thorough job documenting how to set up the Apache mod_wsgi to enable the Apache web server to operate as a unified web server and WSGI app server.
The Gunicorn WSGI app server natively supports the HTTP protocol, so in its out-of-the-box state it's able to directly handle HTTP traffic from the wider Internet, although even Gunicorn's designers recommend you run it behind a proxy -- like figure 5-1. That said, let's a look at a simple Gunicorn configuration to directly attend HTTP requests and operate as a unified web server and WSGI app server.
Similar to the uWSGI app server, the easiest way to install the Gunicorn app server is through pip with the command python3 -m pip install gunicorn . Once you install Gunicorn, confirm its executable is installed correctly running which gunicorn, the output should return the location of the gunicorn executable (e.g. /usr/local/bin/gunicorn or <virtual_env_home>/bin/gunicorn), if you see no output then Gunicorn wasn't installed correctly and you'll need to review the pip logs for more details.
Listing 5-15 shows a gunicorn command with various configuration options, similar to those used by uWSGI in listing 5-11, except in this case, Gunicorn is configured to listen directly on port 80 where HTTP requests are typically sent.
Listing 5-15 Gunicorn with basic configuration options
[user@coffeehouse ~]$ sudo gunicorn --bind 127.0.0.1:80 --chdir=/www/STORE/
--pythonpath "/python/beginningdjango/lib/python3.8/site-packages/:/www/STORE/"
--workers 3 --user www-data --group www-data --timeout 180 --max-requests=1000 coffeehouse.wsgi

[18:47:54 -0500] [226767] [INFO] Starting gunicorn 20.1.0
[18:47:54 -0500] [226767] [INFO] Listening at: http://127.0.0.1:80 (226767)
[18:47:54 -0500] [226767] [INFO] Using worker: sync
[18:47:54 -0500] [226769] [INFO] Booting worker with pid: 226769
[18:47:54 -0500] [226770] [INFO] Booting worker with pid: 226770
[18:47:54 -0500] [226771] [INFO] Booting worker with pid: 226771
Notice the configuration parameters used by the Gunicorn app server in listing 5-15 are almost identical to those used by the uWSGI app server in listing 5-11. If you review table 5-2 once again -- that describes the meaning of each uWSGI configuration parameter -- you'll be able to understand to meaning of each Gunicorn configuration parameter. Similarly, the Gunicorn app server has dozens of configuration parameters you can leverage to optimize its operation, including a --daemon flag to place Gunicorn in the background just like uWSGI.
What's special about the Gunicorn command in listing 5-15 vs. the uWSGI in listing 5-11, is Gunicorn is configured to run on port 80 and is also able to attend HTTP requests directly, fulfilling both the duties of a web server and WSGI app server. Therefore, if you open up a browser and point it to the 127.0.0.1 address, you'll be able to access the Django application.
Tip You can configure the uWSGI app server to listen directly for HTTP requests by using the--http-socketflag vs.--socket(e.g.uwsgi --http-socket 127.0.0.1:80 ...)
Event-loop ASGI setup: An async app server
The first thing you should understand about an ASGI app server is it's designed to work with a Python async application (a.k.a. ASGI application). This means that for ASGI to work as intended you need two parts, an ASGI app server -- that's the topic of this section -- plus an ASGI application designed from the ground-up, which is the topic of the Django async application chapter.
What can lead to some confusion is any Django application can operate with either an ASGI or WSGI app server, all that's needed is one of the bootstrap scripts asgi.py or wsgi.py, respectively, that are included in all Django projects. However, having the ability to launch a Django application with either an ASGI or WSGI app server, doesn't mean you'll get any benefits, remember you need two parts to get benefits: An ASGI app server & ASGI application to run ASGI correctly; or a WSGI app server & WSGI application to run WSGI correctly; inclusively, a WSGI application can happily run on ASGI app server, since the latter can handle standard HTTP requests/responses used by WSGI applications; albeit, a WSGI app server can't handle a specific sub-set of requests/responses (e.g. Web sockets) used by certain ASGI applications.
An analogy to this scenario is similar to that of the USB 2.0/3.0/4.0 standards used by flash drives, cables and hardware ports. Simply using an USB 4.0 cable, doesn't mean you'll get its benefits if its plugged into a USB 2.0 flash drive, to reap all its benefits, you need to have end-to-end USB 4.0 support -- on the flash drive, on the cable & on the hardware port. Along the same lines, you can use an ASGI app server with any Django application, but if the Django application doesn't make use of async views, async templates & other design patterns intended for async Python applications, using an ASGI app server is either a moot point or detrimental to its overall deployment. In essence, you shouldn't use an ASGI app server, unless a Django application is designed to work with it. With this high-level view of ASGI and pointing you toward the Django async application chapter if you want to learn more about what constitutes an async Python/Django application, let's take a look at the deployment process of an ASGI app server.
ASGI app servers can use the same two deployment architectures described earlier for WSGI app servers: operating behind a proxy web server or directly attending requests from the wider Internet. Similarly and for practically the same reasons, the recommended approach is to run an ASGI app server behind a proxy web server, therefore I'll concentrate on this deployment architecture for ASGI app servers.
ASGI app servers are different than WSGI app servers in how they handle requests/responses internally and the protocols they support, all of which are intended to attend long-lived & real-time web requests/responses. As you learned in previous sections, WSGI app servers rely on dozens of threads/processes to scale, ASGI app servers instead rely on a single thread/process with a very different design based on an event-loop that allows it to scale better and for longer-lived requests/responses. Similarly, while WSGI app servers operate with the popular HTTP protocol, this protocol's design is ill suited for real-time web requests/responses that can benefit greatly from a bi-directional connection, in this sense, ASGI app servers support protocols like Web sockets and HTTP/2 intended for real-time web requests/responses.
Although ASGI app servers are still relatively new, there are already various ASGI app server options to choose from with different features sets. So similar to how WSGI app servers offer the same solution and yet differ in features they offer and how they operate internally, ASGI app servers follow the same pattern. The three leading ASGI app servers are the following:
- Daphne[10].- An ASGI app server built by Django core members. Its purpose is to support Django channels, which is a project that supports real-time web features in Django (e.g. Web sockets).
- Hypercorn[12].- An ASGI app server inspired by the Gunicon WSGI app server described earlier. Uses a variety of libraries to support different protocols (e.g.
sans-io,hyper,h11,h2,wsproto) and also supports multiple event-loop foundations through various libraries (e.g.asyncio,uvloop,trio). - Uvicorn[11].- An ASGI app server with tight integration with the Gunicon WSGI app server described earlier. Designed with speed in mind, it uses the
uvlooplibrary -- based on Cython -- for its event-loop foundation, useshttptoolsfor HTTP protocol support (vs.h11) and thewebsocketslibrary for Web Socket support (vs.wsporto).
Enterprise WSGI/ASGI setup: Containerized with Docker & Kubernetes cluster
Whether you opt to use a WSGI app server or ASGI app server for your Django application, the previous deployment architectures assume the existence of a single WSGI/ASGI app server: the production environment. While this single ad-hoc WSGI/ASGI app server set up may work forever for many teams and organizations, for others there will come a need to migrate to a more sophisticated and enterprise type deployment architecture.
The main problem with an ad-hoc WSGI/ASGI app server set up is it can become very hard to replicate and update. As teams and organizations grow, the need for multiple people and teams to work with an identical environment as the production environment can become critical, since a failure to do so, can lead to unexpected bugs, failed deployments and application downtime. In this sense, I'm not referring to simply sharing a WSGI/ASGI app server configuration among peers like you would a Django application's code, but rather a set of software engineering practices often called CI/CD to reliably update and add new features to applications.
One of the major concepts in enterprise CI/CD deployments are containers. A container is used to hold all the required bits and pieces -- at the software level -- needed by an application, including OS dependencies and programming language dependencies (e.g. Python pip packages), among other things (e.g. open OS ports). Imagine having the ability to hit a 'Record' button and all the actions you make on an application and OS are saved, this way they can easily be played back on another machine, so anyone can have a replica of what you did, this is the principle of containers. Although there are many container technologies to choose from now days, the first and still dominant player is Docker.
For Django applications, instead of updating a single ad-hoc production WSGI/ASGI app server environment on every change made to an application, a container image is created -- with all the bits and pieces that compose an application, including a WSGI/ASGI app server -- on every change made to an application, in this manner, a container image is used to roll-out the latest production release and other purposes like automated testing and cluster scalability.
This section's remaining content for Django 4.0 is only available with a subscription.