Django admin create, update, delete record options
Besides Django admin read record options, primarily used to modify the main page of every model in the Django admin (i.e. where the list of records for each model is presented), there are other Django admin pages used to create, update and delete Django model records that also support a series of options.
When you click on the 'Add <model name>' button on the top right of every Django admin page that presents model records, you're taken to a form-like page where you can provide values for a new record -- illustrated in figure 11-23 -- and when you click on a record in a Django admin record list, you're also taken to a form-like page where you can edit or delete field values for the record -- illustrated in figure 11-24.
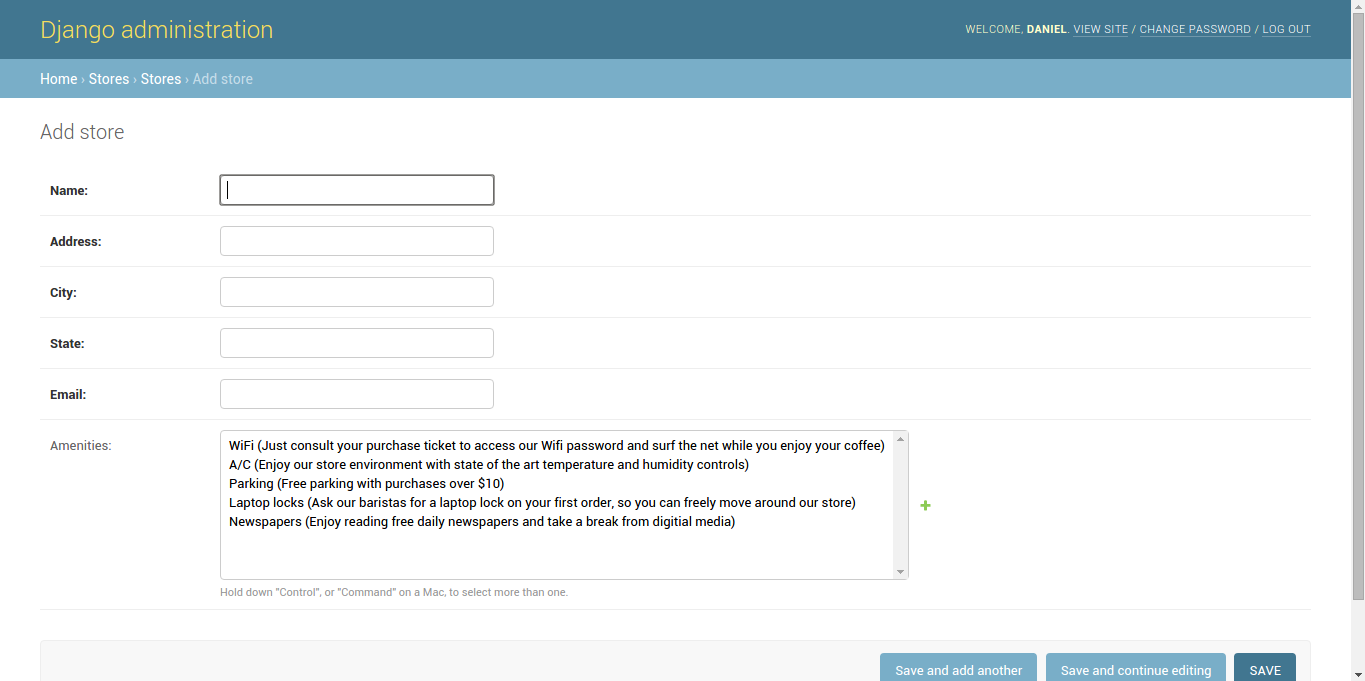
Figure 11-23. Django admin page to create model record
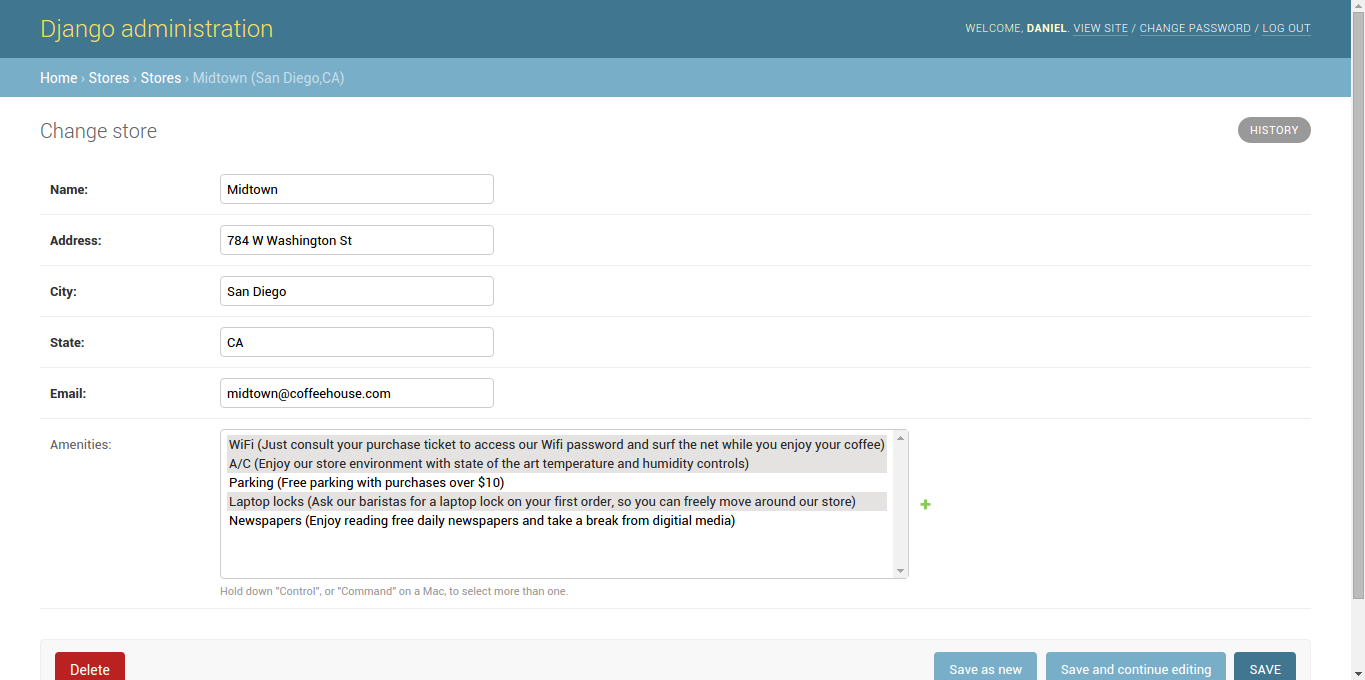
Figure 11-24. Django admin page to edit or delete model record
Tip See thefilter_horizontalandfilter_verticaloptions in figure 11-37 and figure 11-38 for friendlier UIs for the amenities field shown in figure 11-23 and figure 11-24.
In the next sub-sections I'll describe the various options available in the Django admin to create, update and delete records, which is worth noting, is the same page for all three operations.
Record forms: fields, readonly_fields, exclude, fieldsets, formfield_overrides, form, prepopulated_fields
By default, the Django admin
generates a form for all the fields in a Django model you're
working on. For example, in figure 11-23 and figure 11-24 you can see six
fields in the Django admin form which correspond to six field
definitions for the Store Django model. Behind the
scenes, since the Django admin uses forms filled with model
records, Django admin forms operate and have options which are
almost identical to the model forms described in Chapter 9.
The first option available to
alter the amount of Django admin form fields vs. its backing model
is the fields option. The fields option
lets you alter the order in which the form fields appear or create
a form with a sub-set of model fields. Listing 11-15 illustrates
the use fields in a Django admin class and figure
11-25 illustrates the UI generated by listing 11-15.
Listing 11-15. Django admin fields option for Django admin forms
class StoreAdmin(admin.ModelAdmin):
      fields = ['address','city','state','email']

admin.site.register(Store, StoreAdmin)
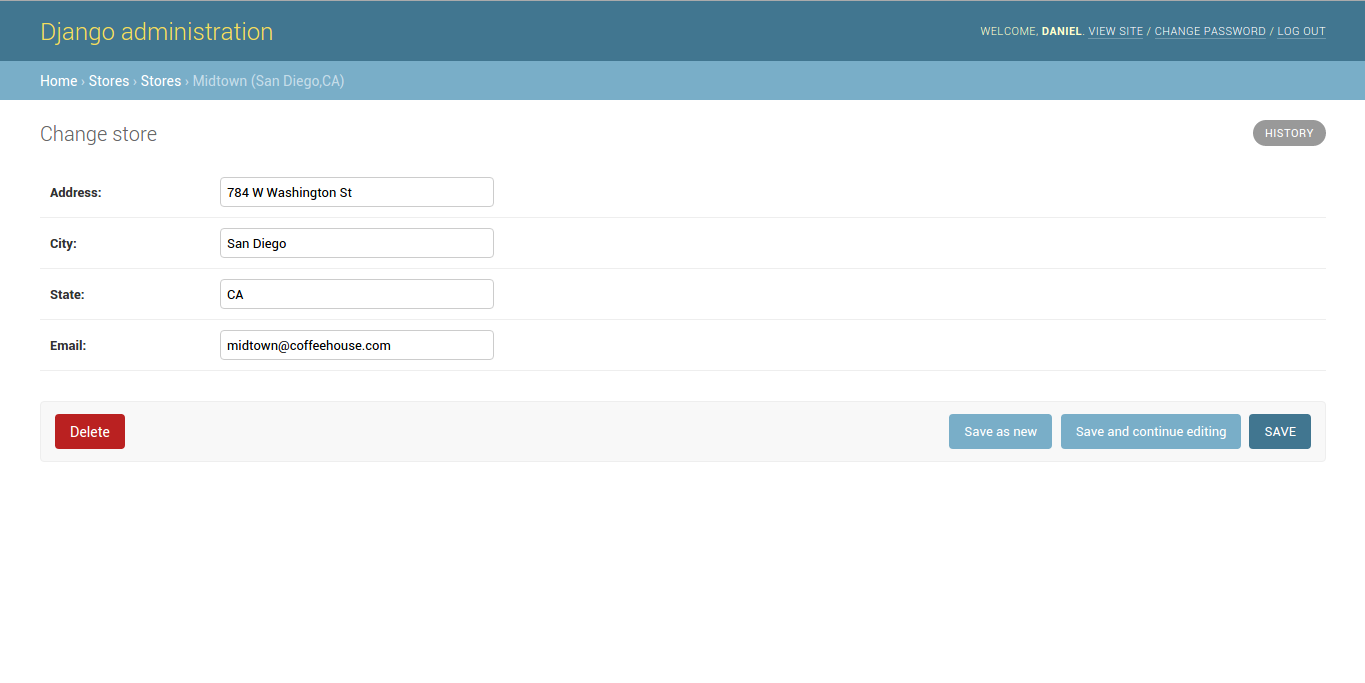
Figure 11-25.- Django admin fields option for Django admin forms
In listing 11-15 you can see the
fields option contains four fields vs. six fields in
the original backing Store Django model and in figure
11-25 you can confirm Django admin form is generated with just four fields.
Another variation of the same
fields option for Django admin forms is combining
multiple form fields into the same UI line. This is easily achieved
by nesting fields in their own tuple. For example, if you define
fields = ['address',('city','state'),'email'], the
city and state forms fields are generated
on the same line in the form, as illustrated in figure 11-26.
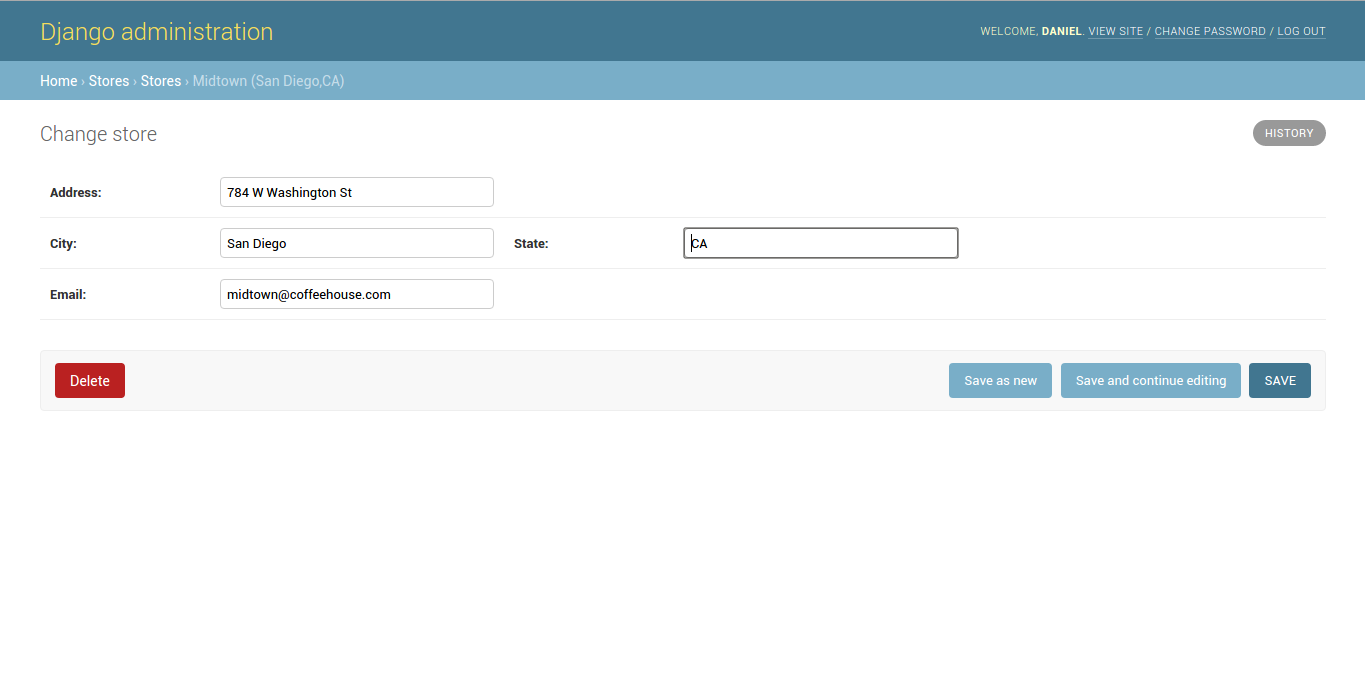
Figure 11-26. Django admin fields option with wrapped fields for Django admin forms
Tip The list_editable option creates an inline form to edit records without the need to enter a dedicated form page like the one in figure 11-25 and figure 11-26. See the previous section on 'Record links and inline edit'.
As helpful as the
fields options is, on other occasions it can be
necessary to display a form field but not allow it to be changed,
because omitting a field altogether may lead to confusion. To
disallow the editing of a form field you can use the
readonly_fields option. Listing 11-16 illustrates the
use of the readonly_fields option and figure 11-27 its
UI layout.
Listing 11-16. Django admin readonly_fields option for Django admin forms
class StoreAdmin(admin.ModelAdmin):
      readonly_fields = ['name','amenities']

admin.site.register(Store, StoreAdmin)
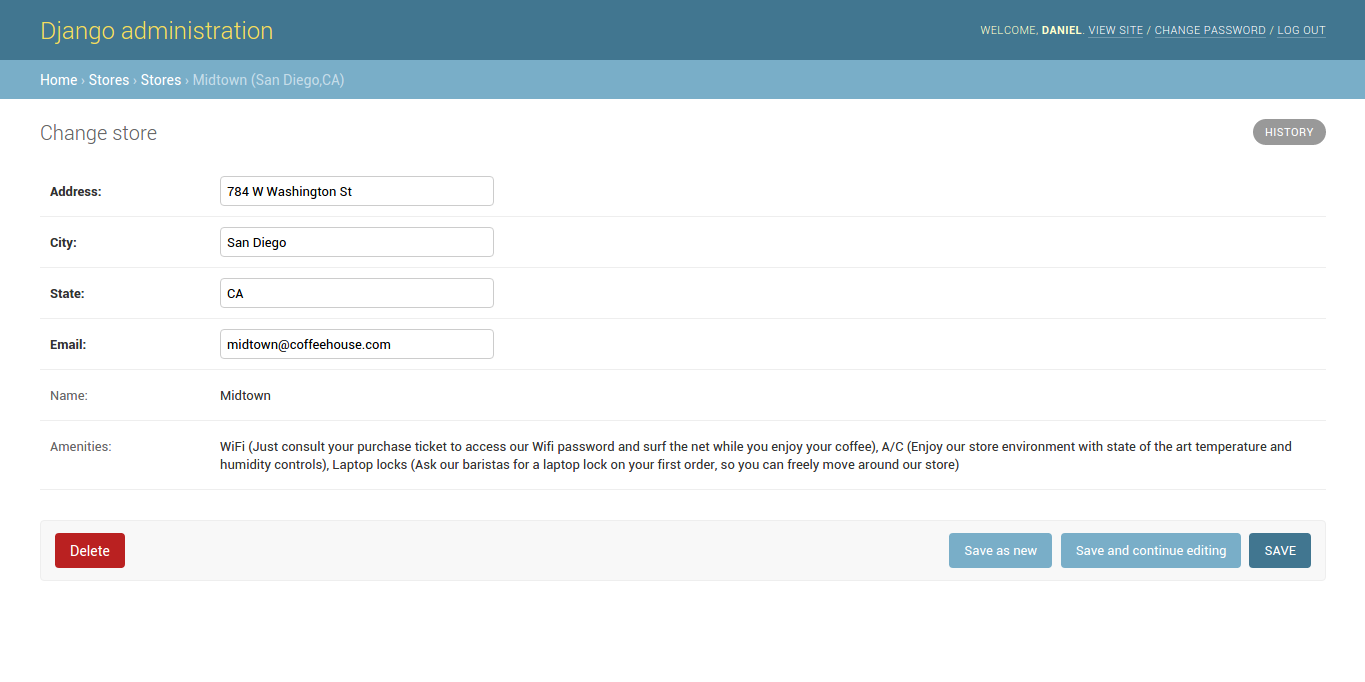
Figure 11-27. Django admin readonly_fields option for Django admin forms
In listing 11-16 you can see the
readonly_fields option make the name and
amenities fields read only. Because the fields option
is not used, all the model fields are used to generate a form. In
figure 11-27 you can see how the name and
amenities fields are shown as text rather than input
form fields, making them ineditable.
A side-effect of only using the
readonly_fields option is that these field definitions
are placed at the bottom of the form, as seen in figure 11-27. If
you want to maintain the same form field order as the original
Django model, then you need to explicitly define the form fields
using the fields option, in this way the form field
order follows the fields option and any field in
readonly_field is displayed as read-only, respecting
the field position set in the fields option.
Besides supporting model field
names, the readonly_fields option also supports
callable methods to further add custom behavior. Listing 11-17
illustrates the use of the readonly_fields option with
a callable and figure 11-28 the UI layout.
Listing 11-17. Django admin readonly_fields option with callable for Django admin forms
from django.utils.safestring import mark_safe

class StoreAdmin(admin.ModelAdmin):
    fields = ['name','address',('city','state'),'email','custom_amenities_display']
    readonly_fields = ['name','custom_amenities_display']
    def custom_amenities_display(self, obj):
        return mark_safe("Amenities can only be modified by special request, please contact the
                                 store manager at %s to create a request" % (obj.email,obj.email))
    custom_amenities_display.short_description = "Amenities"

admin.site.register(Store, StoreAdmin)
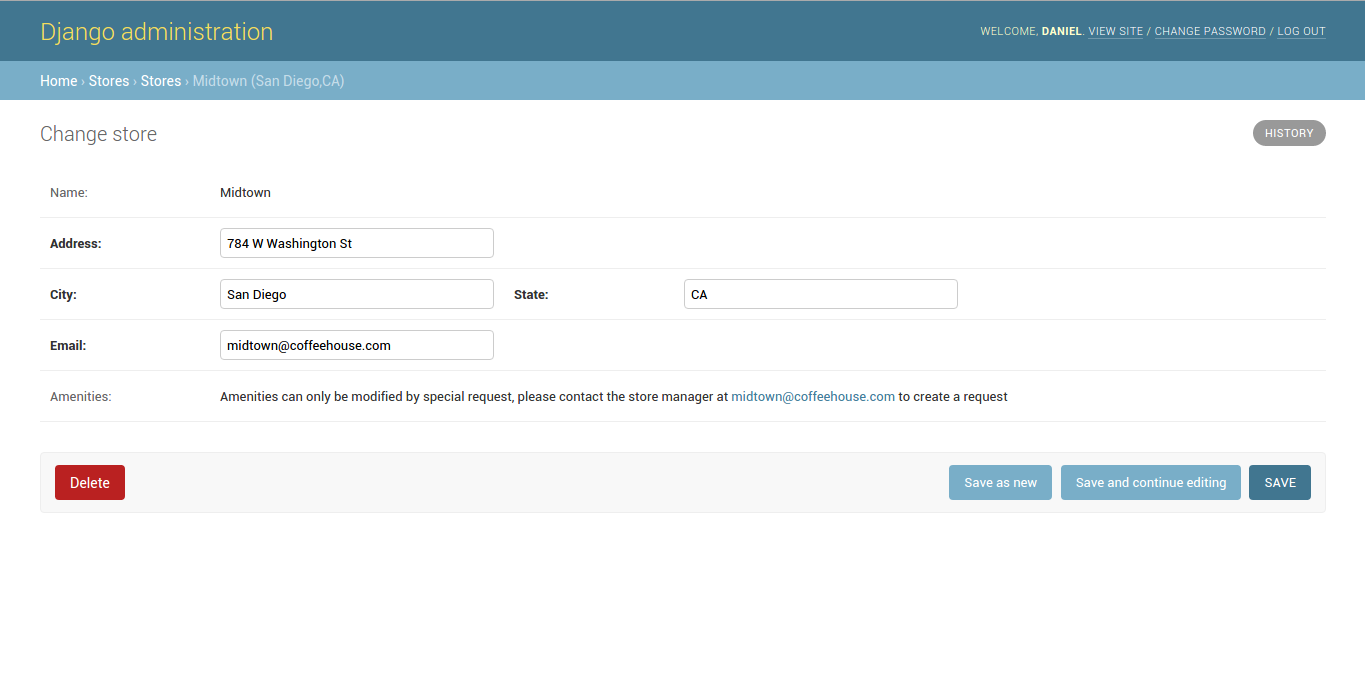
Figure 11-28. Django admin readonly_fields option for Django admin forms
In listing 11-17 you can see the
readonly_fields option uses the
custom_amenities_display callable to create a custom
field. In figure 11-28 toward the bottom, you can see this new
custom field -- in place of the original amenities
field -- which shows a friendlier message than figure 11-27 and is
also ineditable.
The exclude option
for forms in Django admin classes is complementary to the
fields option. Where as the fields option
requires to explicitly create of list of fields to include in a
Django admin form, the exclude offers the inverse
behavior, requiring to explicitly list fields that shouldn't be
part of a Django admin form. For example, for a Django model with
the fields a,b,c the Django admin class fields = ('a','b') option
is equivalent to the exclude = ('c') option (i.e. both options
generate the same Django admin form).
The fieldsets option
for Django admin classes provides greater control over the layout
of pages used to create and edit records in the Django admin.
Unlike the fields option which can alter the order of
form fields or even nest form fields on the same line -- as
illustrated in figure 11-26 -- the fieldsets option
works with the fields option to divide a page into sets. Listing
11-18 illustrates the use of the fieldsets option and
figure 11-29 and 11-30 the corresponding layout.
Listing 11-18. Django admin fieldsets option for Django admin forms
from django.utils.safestring import mark_safe

class StoreAdmin(admin.ModelAdmin):
    fieldsets = [
        ['Store general information', {
            'fields': ['name', 'email']
        }],
        ['Store location options', {
            'classes': ['collapse'],
            'fields': ['address',('city', 'state')],
        }],
    ]

admin.site.register(Store, StoreAdmin)
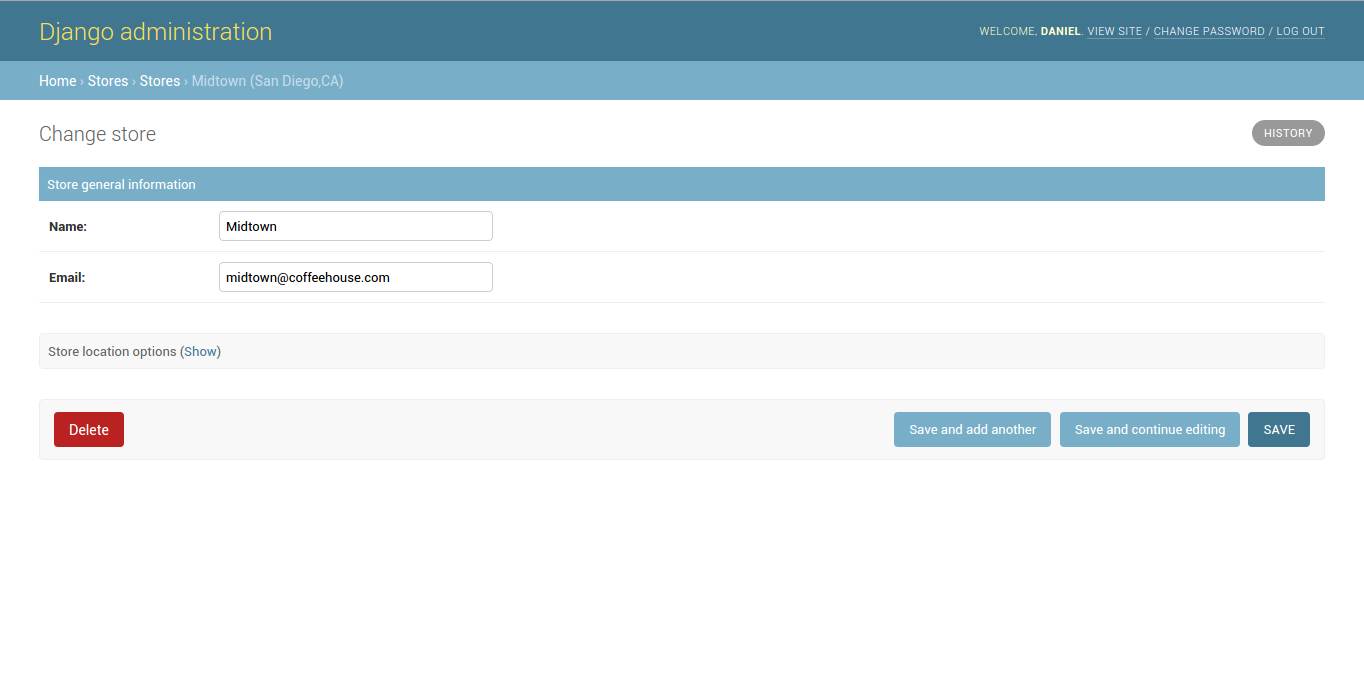
Figure 11-29. Django admin fieldsets option for Django admin forms
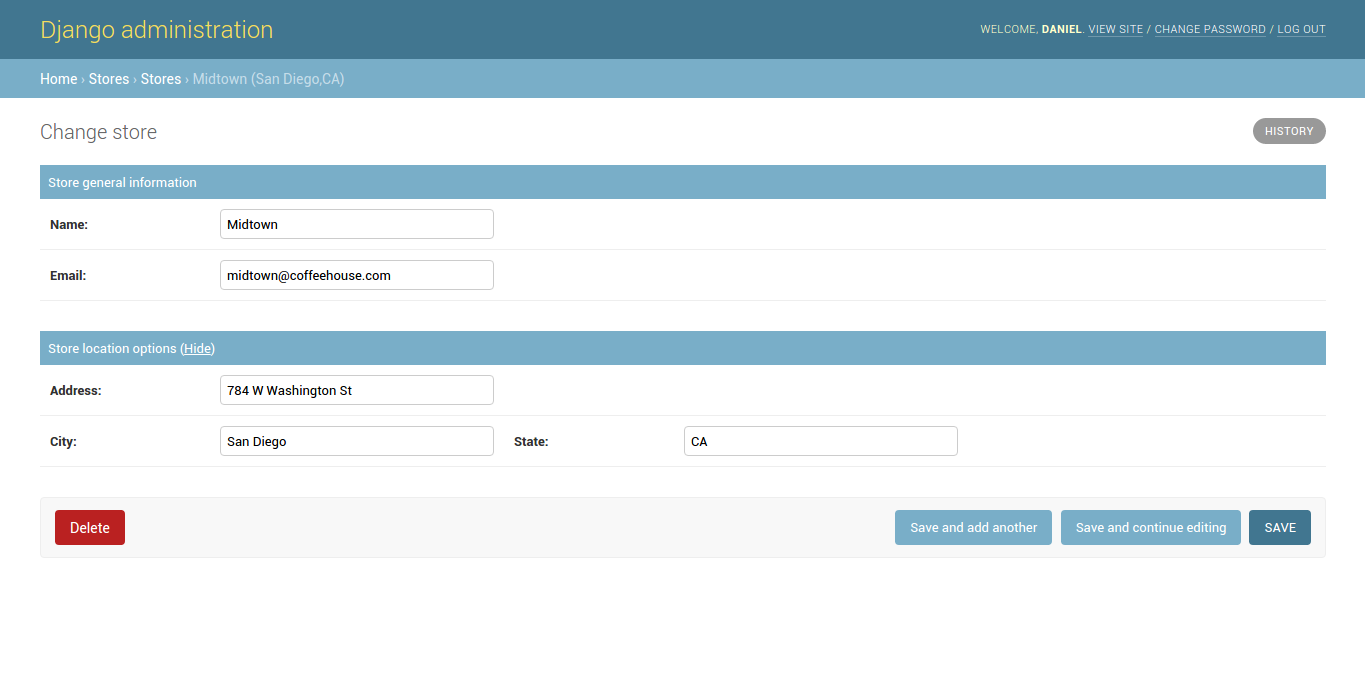
Figure 11-30. Django admin fieldsets option for Django admin forms (collapsed)
In listing 11-18 you can see the
fieldsets options accepts a list value composed of two
lists, where each list represents a section of the Django admin
page as illustrated in figure 11-29 and figure 11-30. Each of the
internal lists is made up by a first argument that represents the
title or header of the section and a second argument that's a
dictionary. This last dictionary itself contains values assigned to
a fields key -- which functions just like the fields
option described previously -- and a classes key which
gives the section certain behaviors through CSS classes. In this
case, you can see the second section in listing 11-18 indicates
'classes': ['collapse'], which tells Django to make
the section collapsible, in figure 11-29 and figure 11-30 you can
appreciate this collapsed and un-collapsed behavior.
In addition to the
collapse option used in the classes key
in fieldsets, another helpful CSS class option is
wide which adds more horizontal space between fields.
Note that it's valid to add any number of CSS classes to the
classes key, either CSS classes included with the
Django admin (i.e. collapse and wide) or
even custom admin CSS classes.
The
formfield_overrides option provides a way to override
the default form widgets associated with a Django model field in a
Django admin form. By default, all Django model fields have a given
widget assigned to them for the purpose of generating a form -- a
topic discussed in the Chapter 9, specifically table 9-1. However,
if you feel the default widget for a given model field is
inadequate for the Django admin, you can use the
formfield_overrides option as illustrated in listing
11-19.
Listing 11-19, Django admin formfield_overrides option for Django admin forms
from django.contrib import admin
from coffeehouse.items.models import Menu

class MenuAdmin(admin.ModelAdmin):
    formfield_overrides = {
        models.CharField: {'widget': forms.Textarea}
    }

admin.site.register(Menu, MenuAdmin)
The
formfield_overrides option in listing 11-19 tells the
Django admin to use the forms.Textarea widget -- which
generates a standard HTML <textarea> tag -- for all model
fields that use the CharField. In figure 11-32 you can
see the effects of applying the formfield_overrides
option of listing 11-19, where as in figure 11-31 you can see the
default widget used for CharField field which is a
standard HTML <input> tag.
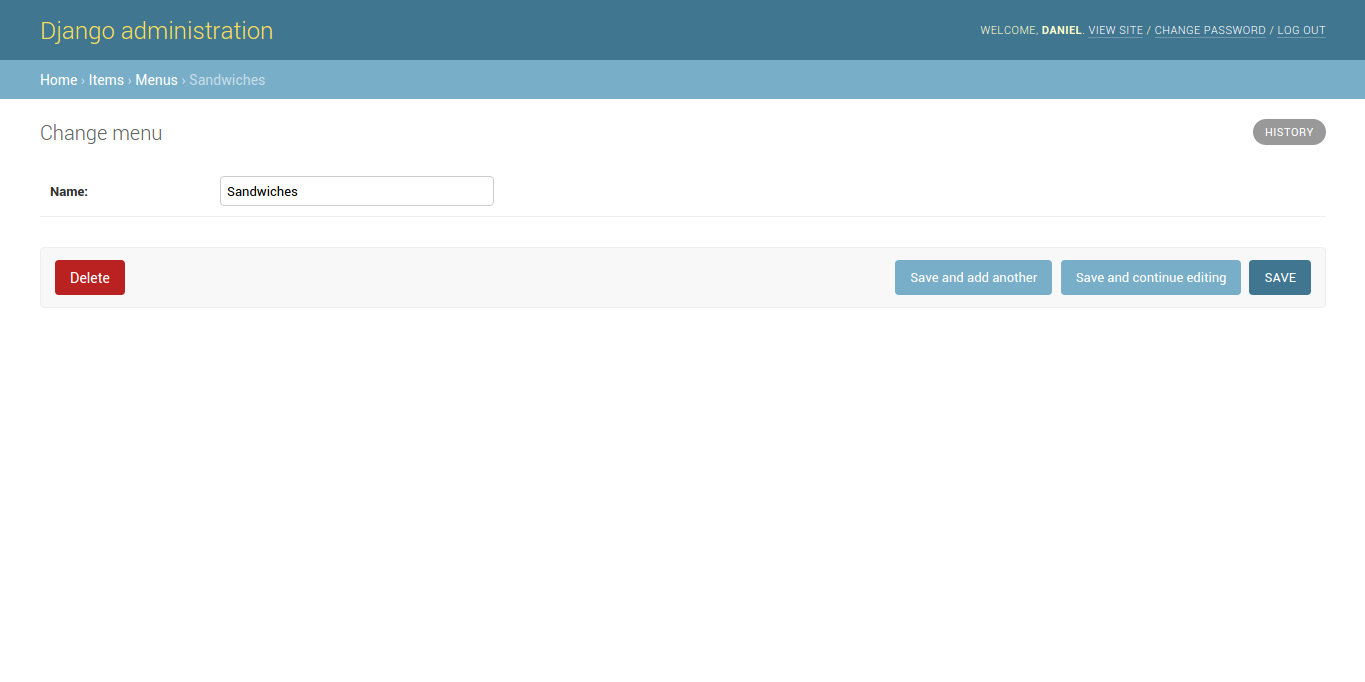
Figure 11-31. Django admin default CharField field display in Django admin form
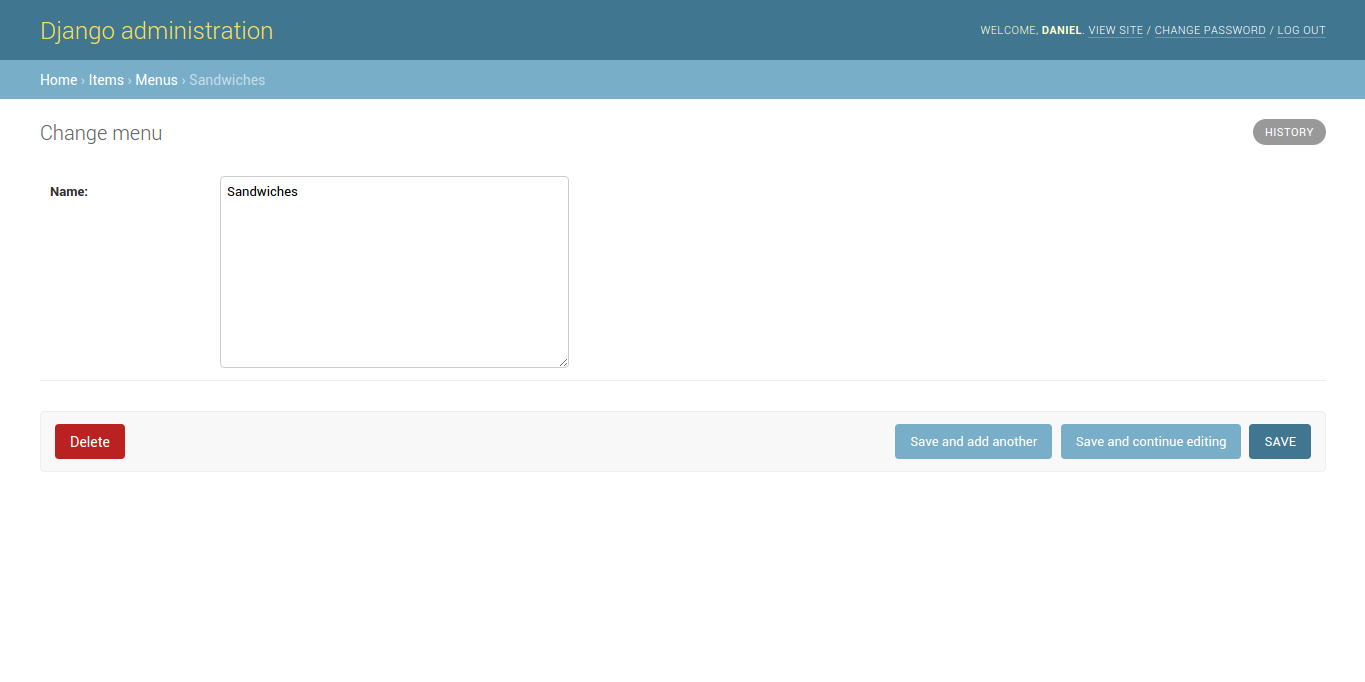
Figure 11-32.- Django admin custom CharField field display in Django admin form using formfield_overrides
While all the previous options
allow you to tweak parts of a form used in the Django admin,
sometimes it's necessary to create a form from scratch for the
Django admin instead of tweaking the underlying form generated by
the Django model (e.g. if you require custom validation for the
Django admin form). To specify a custom form for a Django admin
class you can use the form option.
Finally, one more option
associated with Django admin forms that's specific to models that
require slug field values is prepopulated_fields. If
you're unfamiliar with the term 'slug', in the simplest terms a
slug field value is a machine friendly representation of a string,
for example upper-case letters are converted to lower case and
special characters like spaces are converted to dashes. Through the
prepopulated_fields option, you can tell Django that
while a user types in a value for a given field in a Django admin
form, it automatically fill another field in the form with the slug
representation of the first.
For example, for the
prepopulated_fields = {'address': ['city','state']}
option, if a user types in a value of San Diego into the city form
field and CA in state, Django fills the address form
field with the value of san-diego-ca. It's worth
mentioning this functionality is achieved through JavaScript
integrated into the Django admin and also that the
prepopulated_fields option doesn't accept
DateTimeField, ForeignKey or
ManyToManyField fields as backing model data
types.
Actions, links and positions: save_on_top, save_as (Clone records), save_as_continue and view_on_site
At the bottom of each form page
to create, update and delete Django model records are all the
buttons to perform actions on the page: 'Delete','Save and add
another','Save and continue editing' and 'Save', all of which are
illustrated in figure 11-33. If a form is too large it can be
difficult to reach these action buttons without scrolling down, so
to solve this scenario Django admin classes support the
save_on_top option which creates the same action
buttons at the top of the page as illustrated in figure 11-34. Note that to generate the layout in figure 11-34 you use
save_on_top = True.
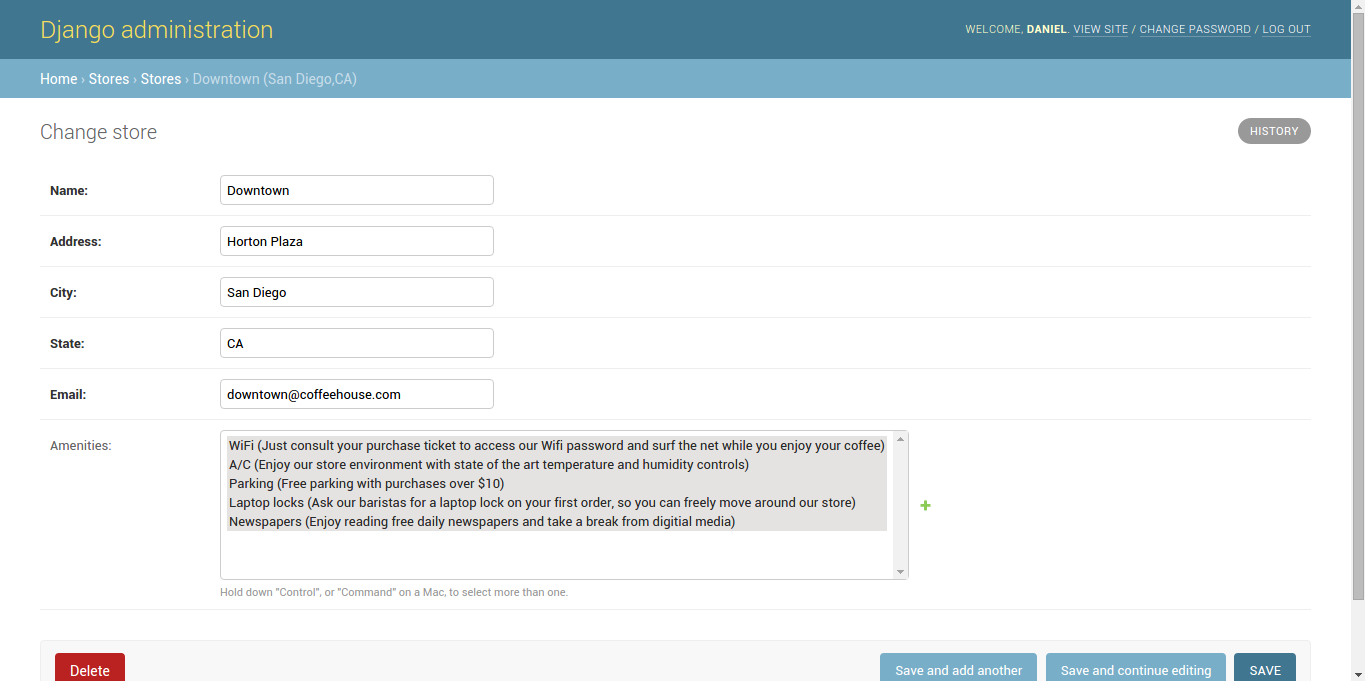
Figure 11-33. Django admin standard action button on form page
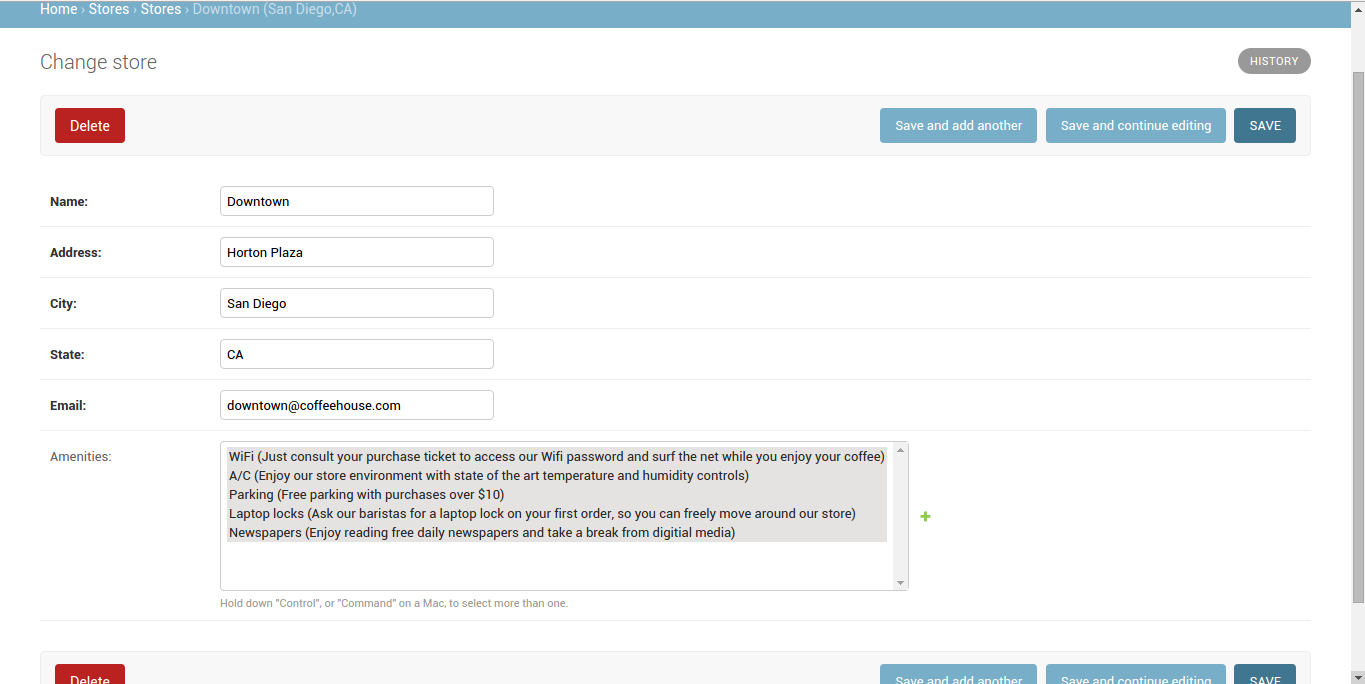
Figure 11-34. Django admin save_on_top option on form page
Sometimes the need can arise to
generate an identical or almost identical record from a
pre-existing record in the Django admin. Because copy-pasting
values from one form to another in the Django admin can be a time
consuming and error prone process, Django admin classes also
support the save_as option to clone pre-existing model
records. If you set the save_as = True option on a
Django admin class, Django replaces the 'Save and add another'
button with the 'Save as new' button, as illustrated in figure 11-35.
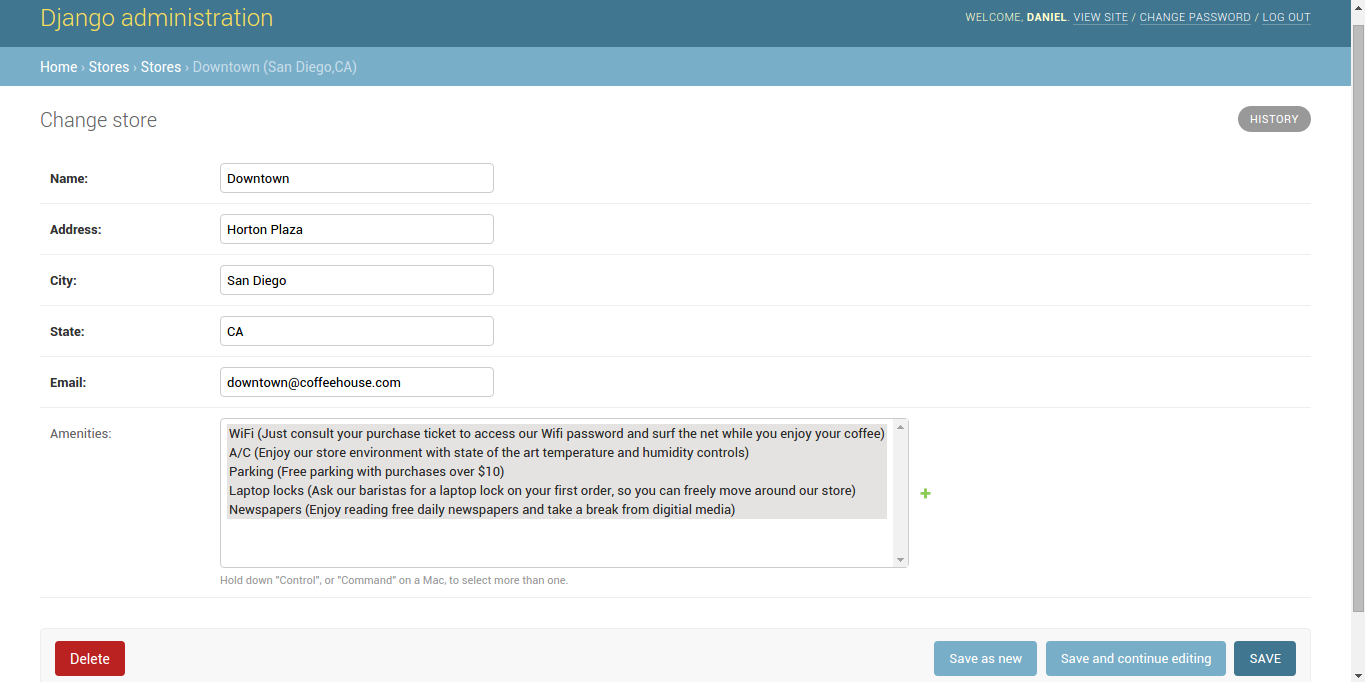
Figure 11-35. Django admin save_as (Clone) option on form page
If you click on the 'Save as new'
button illustrated in figure 11-35, Django saves an identical
record -- effectively cloning the record you see on screen -- using
a different id value to differentiate between the two.
Note that if the underlying Django model prohibits this action
(e.g. fields must be unique) the operation does not take place and
an error is thrown indicating the cause.
When you use the save_as =
True option and perform the action of cloning a record (i.e.
clicking on the 'Save as new' button), the Django admin keeps you
on the form of the newly cloned record in case you want to change
it further. You can use the save_as_continue = False
option, to tell the Django admin to redirect you to the main model
list page after cloning a record.
Django model classes support an
instance method called get_absolute_url() that makes
it possible to resolve the public url of a record via a Django
model's fields (e.g. the urls /store/1/,
/store/2/, /store/3/ fit a pattern, where
each number represents a Store id value, in which case
the get_absolute_url() method for the
Store model would return
/store/<store_record_id>. In the Django admin,
the get_absolute_url() method is tied directly to a
link that aids in viewing the record at its public url destination,
figure 11-36 illustrates this link in the top right corner.
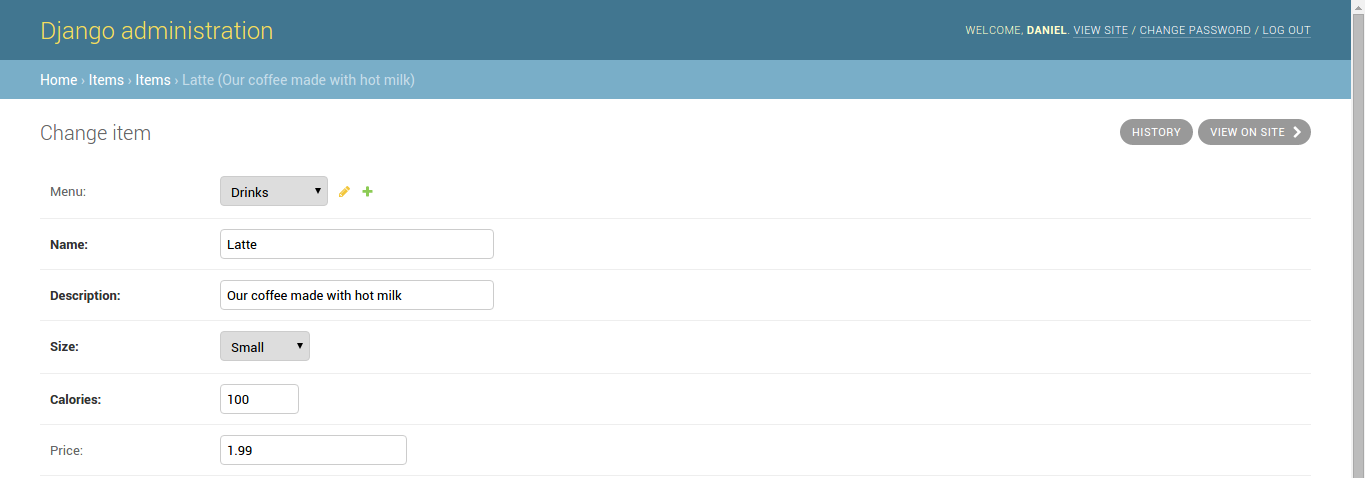
Figure 11-36. Django admin 'View on site' button due to get_absolute_url() Django model method
In figure 11-36, the 'View on
site' button in the top-right generates a link based on the Django
model's get_absolute_url() method, as well as the
current record's value defined in this last method. In this manner,
in a single click you're able to visualize the record you're
editing in the Django admin at its public url destination. If you
wish to disable this button you can add the view_on_site =
False option to the Django admin class. Note that if the
underlying Django model class does not define the
get_absolute_url() method no button is displayed,
irrespective of the view_on_site value.
Relationships: filter_horizontal, filter_vertical, radio_fields, raw_id_fields, inlines
Django model relationships tasks related to create, update and delete operations, also have certain behaviors in the context of Django admin classes that are worth describing separately.
When you use a
ManyToManyField field on a Django model and access it
in the Django admin, Django generates HTML
<select>/<option> form tags to choose the values for
the ManyToManyField field -- as illustrated at the
bottom of figure 11-23 and figure 11-24. However, because this type of
selection method can be cumbersome for large lists, the Django
admin offers the filter_horizontal and
filter_vertical options to generate separate panels to
make value selection easier. Figure 11-37 illustrates the layout of
the filter_horizontal option and figure 11-38 illustrates
the layout of filter_vertical option.

Figure 11-37. Django admin filter_horizontal option for ManyToManyField
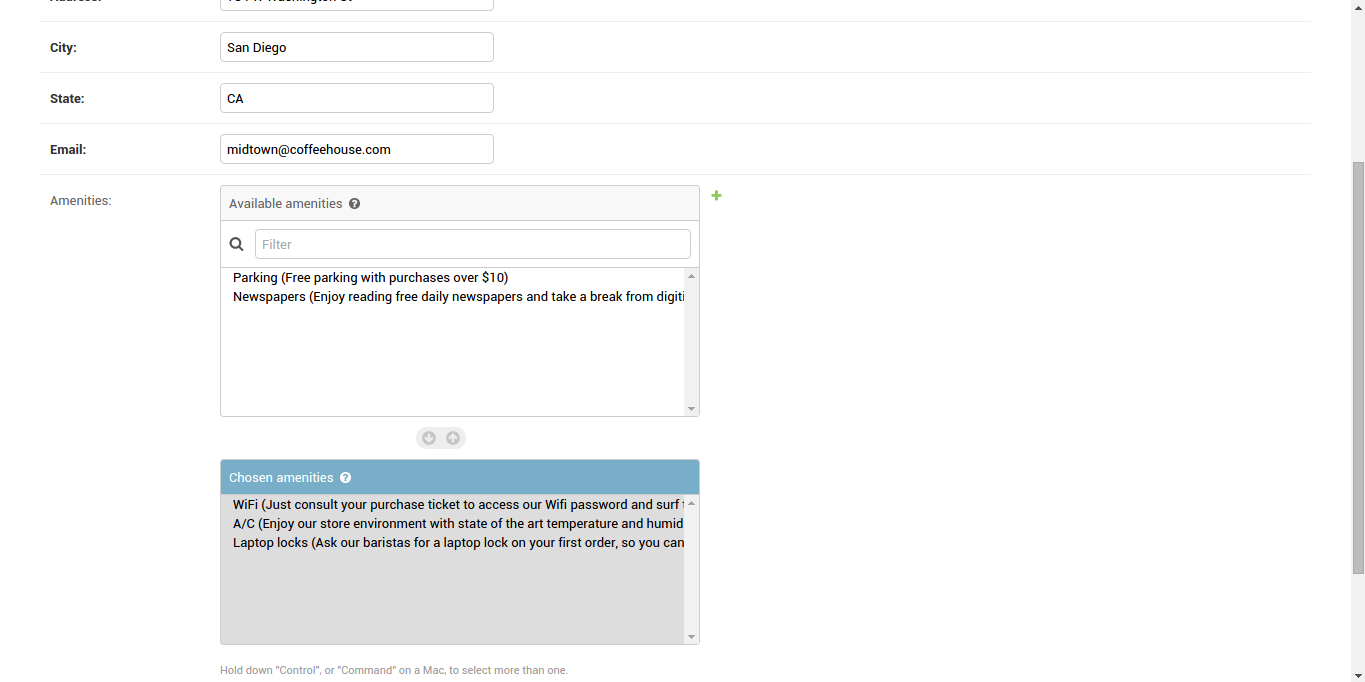
Figure 11-38. Django admin filter_vertical option for ManyToManyField
In figures 11-37 and 11-38 you
can see there are two panels to select and unselect values for a
given ManyToManyField, with the only difference being
filter_horizontal stacks the panels horizontally -- in
figure 11-37 -- and filter_vertical stacks the panels
vertically -- in figure 11-38.
Assuming the
ManyToManyField field is named amenities,
to achieve the layout in figure 11-37 you would declare
filter_horizontal = ['amenities'] and to achieve the
layout in figure 11-38 you would declare filter_vertical =
['amenities'].
When you use a
ForeignKey model data type or the choices
option in a Django model field and access it in the Django admin,
Django also generates HTML <select>/<option> form tags
to choose the value for the ForeignKey field -- as
illustrated at the top of figure 11-39.
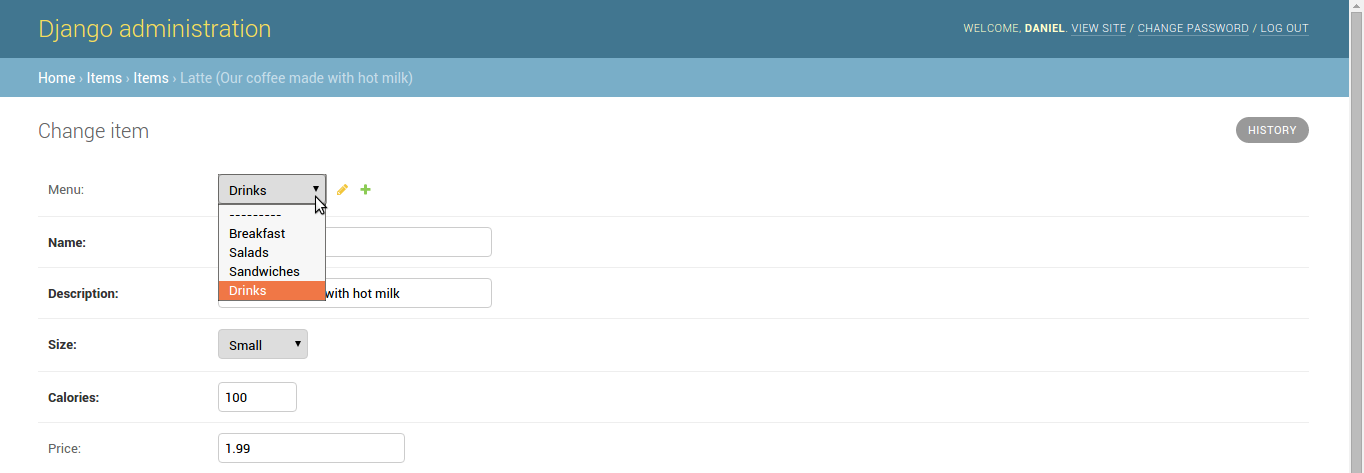
Figure 11-39. Django admin default select list for ForeignKey or choices option
A Django admin class can change
this default layout with the radio_fields option to
generate a layout with HTML radio buttons. Listing 11-20
illustrates the two alternatives for the radio_fields
option in a Django admin class and figures 11-40 and 11-41 the UI
layouts.
Listing 11-20. Django admin radio_fields option for ForeignKey field
from django.contrib import admin
from coffeehouse.items.models import Item

# Option 1 (Horizontal)
class ItemAdmin(admin.ModelAdmin):
    radio_fields = {"menu": admin.HORIZONTAL}

admin.site.register(Item, ItemAdmin)

# Option 2 (Vertical)
class ItemAdmin(admin.ModelAdmin):
    radio_fields = {"menu": admin.VERTICAL}

admin.site.register(Item, ItemAdmin)
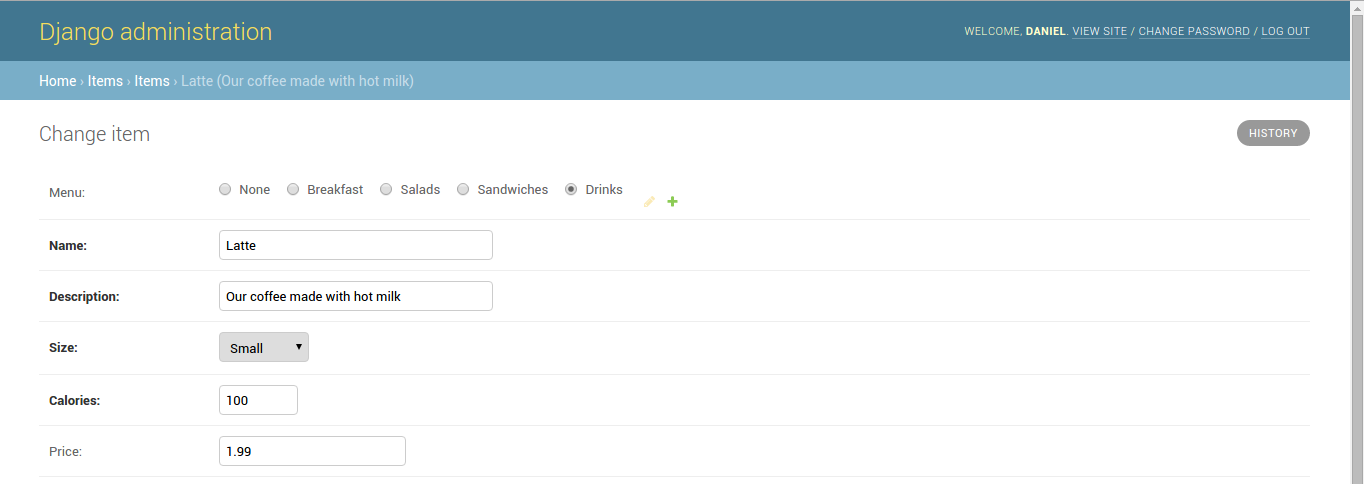
Figure 11-40. Django admin horizontal radio_fields option for ForeignKey or choices option
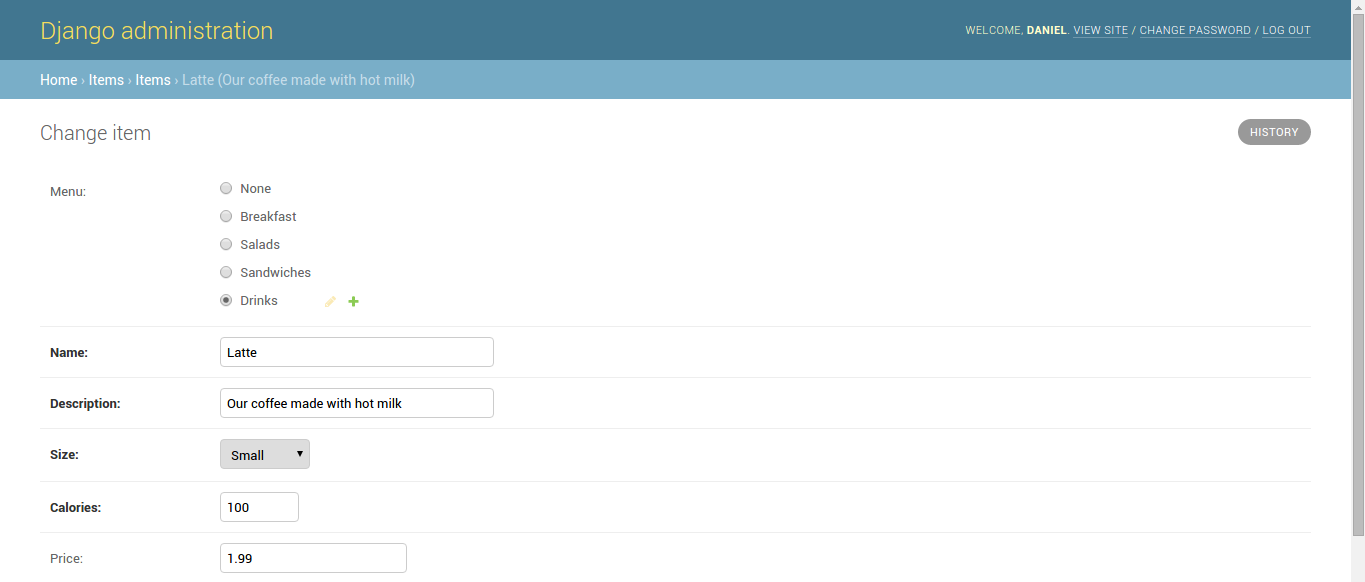
Figure 11-41. Django admin vertical radio_fields option for ForeignKey or choices option
In listing 11-20 you can see
option one defines the radio_fields value with the
{"menu": admin.HORIZONTAL} dictionary, where
menu represents the ForeignKey field or a
field with the choices option and
admin.HORIZONTAL is the orientation of the radio
fields -- this option generates a layout like the one in figure 11-40. Option two in listing 11-20 defines the
radio_fields in a similar way except it uses the
admin.VERTICAL value to tell the Django admin to
generate a vertical layout for the radio fields as illustrated in
figure 11-41.
Another Django admin alternative
for ForeignKey or ManyToManyField fields
is the raw_id_fields option, which as its name implies
relies on the raw id field value(s) to assign a
ForeignKey value or ManyToManyField
values. Figure 11-42 illustrates how a raw_id_fields
option looks like in the Django admin.
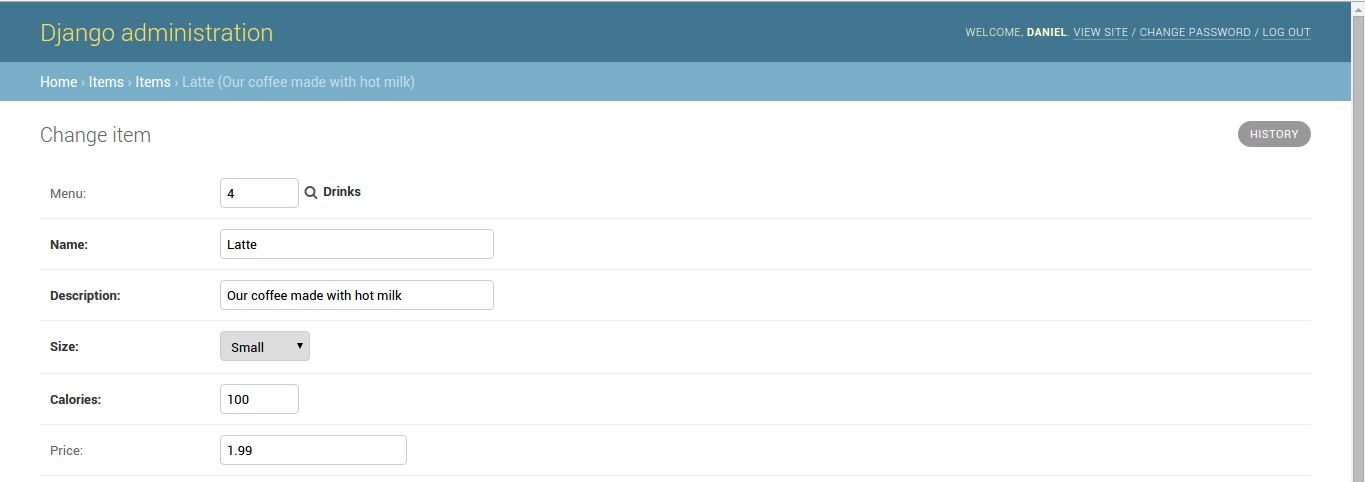
Figure 11-42. Django admin raw_id_fields option for ForeignKey or ManyToManyField option
As you can see in figure 11-42,
the Django admin generates a basic text box where you can assign
id values, aided by the adjacent magnifying glass
button that allows you to search for and select values. Assuming
the ForeignKey or ManyToManyField field
is named menu, to achieve the layout in figure 11-42
you would declare raw_id_fields = ["menu"]. Note that
for a ForeignKey field the acceptable value is a
single id and for a ManyToManyField field
you can also introduce a list of ids separated by commas (i.e. a
CSV)
Finally, we come to the Django
admin class inlines option, designed for reverse
models relationships. When you create or edit a model with a
relationship in the Django admin, if this is done on the model with
the relationship field definition (i.e. ForeignKey or
ManyToManyField), the Django admin displays the
related model values inline or adds a '+' button to add new model
values, as shown in figure 11-37 -- for ForeignKey
menu values -- and figure 11-39 -- for
ManyToMany amenities values. However,
when you attempt to edit or create values on the reverse model
relationship (i.e. the model that doesn't have the relationship
field) the Django admin only shows the model by itself as shown
figure 11-31. It's possible to edit or create related model values
on a reverse model relationship with the inlines
option
The inlines option
first requires you create a Django admin TabularInline
or StackedInline class, both of which are sub-classes
of the InlineModelAdmin class which is a more
specialized version of the standard admin.ModelAdmin
class used to create standard Django admin classes. Once you have
TabularInline or StackedInline class, you
can declare it as part as the value of the inlines
option.
Listing 11-21 illustrates two
Django admin examples that use a TabularInline and
StackedInline class on a models that have a one to
many and many to many relationship.
Listing 11-21. Django admin inlines option for ForeignKey and ManyToManyField field
# admin.py (ForeignKey)
from django.contrib import admin
from coffeehouse.items.models import Item, Menu

class ItemInline(admin.TabularInline):
    model = Item

class MenuAdmin(admin.ModelAdmin):
    list_display = ['name']
    inlines = [
        ItemInline,
    ]

admin.site.register(Menu, MenuAdmin)

# admin.py (ManyToManyField)
from django.contrib import admin
from coffeehouse.stores.models import Store, Amenity

class StoreInline(admin.StackedInline):
    model = Store.amenities.through

class AmenityAdmin(admin.ModelAdmin):
    inlines = [
        StoreInline,
    ]

admin.site.register(Amenity, AmenityAdmin)
The first example in listing
11-21 illustrates the ItemInline class which inherits
its behavior from built-in TabularInline class.
Because this last class is designed to represent a model in the
Django admin, it also declares the model field with
the Item model class. Next, the MenuAdmin
class is a standard Django admin class designed for the
Menu model class, but notice it uses the
inlines option with the ItemInline class.
Because of this last configuration, when you go to edit or create
Menu model record in the Django admin, all
Item model records associated with a given
Menu model record are displayed inline as illustrated
in figure 11-43.
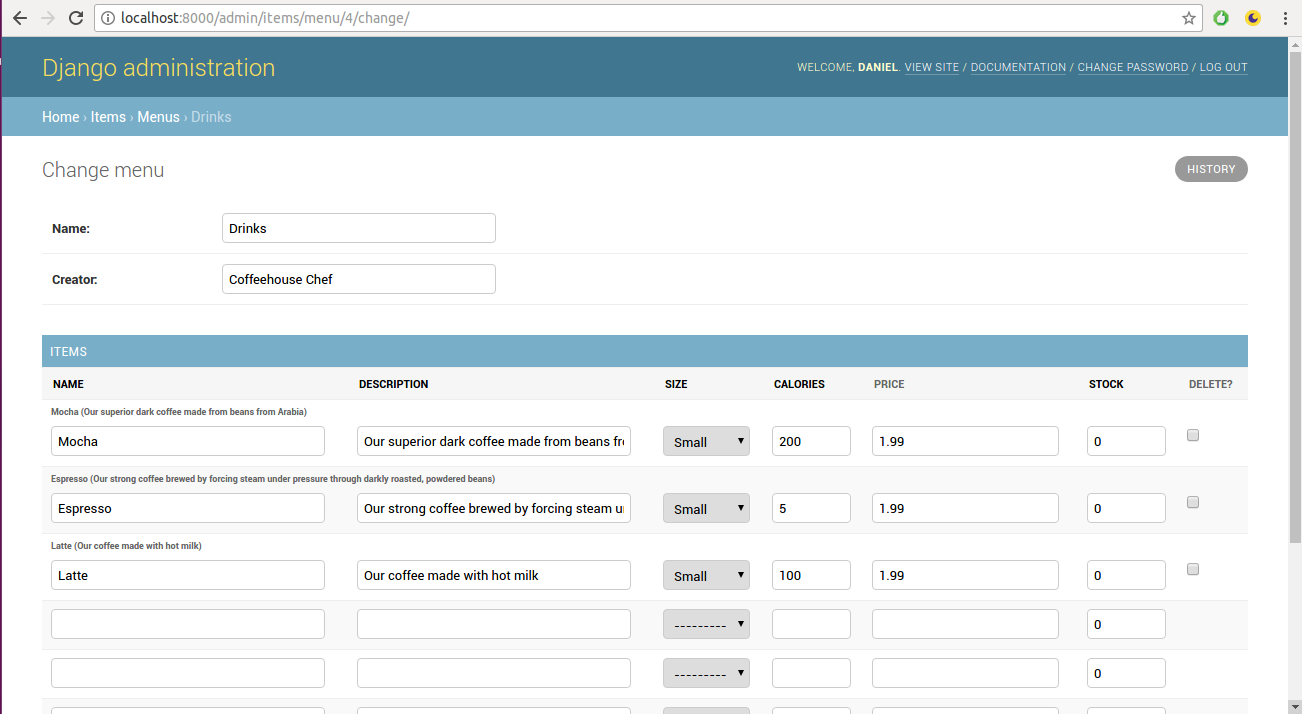
Figure 11-43. Django admin inlines option with TabularInline for ForeignKey
As you can see in figure 11-43,
in addition the standard Django admin form to edit or create
Menu records, there's also a formset displaying all
Item model records for the given Menu
record, in this case, the formset contains Item
records that belong to the Drinks Menu
record. Also notice the form fields for each form in the formset in
figure 11-43 are inlined as tabs, which is a behavior provided by
the TabularInline class.
The second part of listing 11-21 illustrates the StoreInline class which inherits its
behavior from built-in StackedInline class. Because
this last class is designed to represent a model in the Django
admin, it also declares the model field with the
Store.amenities.through model class, this additional
model syntax -- amenities.through -- is necessary
because the Store to Amenity model is a
many to many relationship. Note the through keyword is
standard for many to many relationship queries and is described in
the earlier Django model chapters.
Next, the
AmenityAdmin class is a standard Django admin class
designed for the Item model class, but notice it uses
the inlines option with the StoreInline
class. Because of this last configuration, when you go to edit or
create an Amenity model record in the Django admin,
all Store model records associated with a given
Amenity model record are displayed inline as
illustrated in figure 11-44.
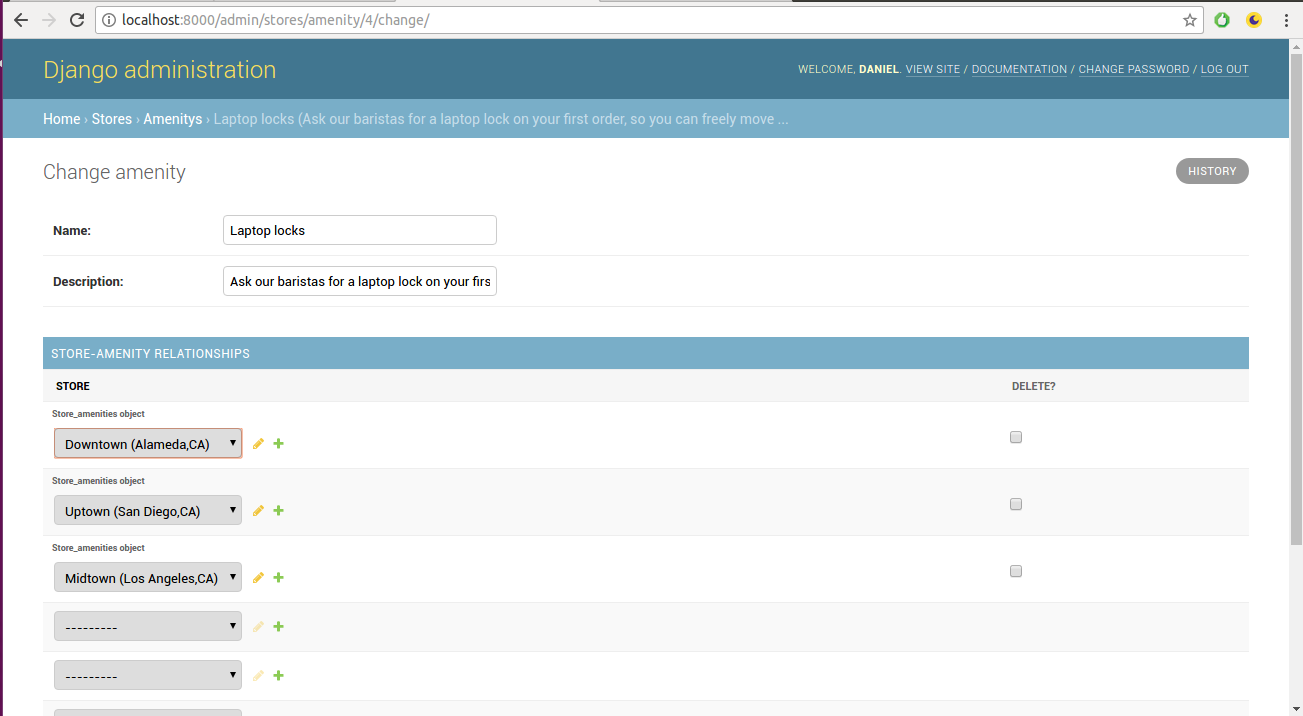
Figure 11-44. Django admin inlines option with StackedInline for ManyToManyField
As you can see in figure 11-44,
in addition the standard Django admin form to edit or create
Amenity records, there's also a formset displaying all
Store model records for the given Amenity
record, in this case, the formset contains Store
records that have the Amenity Laptop
locks record. Also notice the form fields for each form in
the formset in figure 11-43 are inline stacks, which is a behavior
provided by the StackedInline class.
TipInlineModelAdminclasses (i.e.TabularInlineorStackedInline) in addition to themodeloption, also support standard Django admin class --admin.ModelAdmin-- options described earlier (e.g.form,fields,exclude), as well as standard formset options described in Chapter 6 and model formset options described in Chapter 9 (e.g.formset,extra,max_num,min_num)[2]