Tech Ads
Back to Article List
Originally published March 2004 [ Publisher Link ]
JMeter : Stress testing applications
Ever wonder how much traffic your applications can take before they start to show strains? Or what usage peaks your hardware can withstand? You can avoid the guesswork with JMeter, an Apache Foundation Java project used to simulate and analyze workloads on any given resource.
From Perl scripts to Web services, JMeter allows you to stress-test your applications in a controlled manner so you know your maximum capacity beforehand, thus preventing an unexpected meltdown. In this article we will describe various ways in which you can use JMeter to stress-test your Web applications.
Since JMeter is a Java-based tool, you need a Java JDK for your environment. Once you have one installed, download JMeter and unzip the downloaded file. Change to the product's bin directory and invoke the jmeter executable, which will bring up JMeter's GUI interface. From this screen you can launch and configure every aspect of your stress tests through a Test Plan.
Test Plans
You create a Test Plan from the pull-down menus provided in the main GUI. From these menus you can define the number of users you wish to simulate, what information is to be sent with each request, and the types of reports you wish to generate from your tests, among a wealth of other things.
Let's configure one of the most basic test plans available in JMeter as a simple example.
- Select the icon named Test Plan on the left side of JMeter's main screen. The right pane will show an input field which allows you to specify its name; say: "my site's workload tests". The other options in this pane allow you to indicate global variables for your test plan and define other advanced features, which for this test we will not address.
- With the cursor placed on the Test Plan icon, right-click and select the
Add -- Thread Groupoption. A thread group for practical purposes can be considered the group of users you want to simulate in your application. Select the
Thread Groupicon you just created. The right pane shows a series of input fields for defining the groups characteristics:Name: Lets you indicate a more verbose name like "Heavy Duty Users".Number of threads: Basically equivalent to the number of users you want to simulate. We will choose 100.Ramp-up period: The lag you wish to have between each group of threads (users). We will choose 15.Loop count: Indicates the number of times you wish to simulate your group of threads (users). If you leave the "Forever" option selected, you will send 100 requests, then wait 15 seconds (ramp-up time), then another 100 requests, and so on. I advise you to deselect the "Forever" option and type 10, so you won't bog down the server just for testing.Scheduler: Allows you to specify start and end times for the thread group. We will just leave this option unchecked and start our thread group at our discretion.
- Once you define the Thread Group, select its icon on the left side, then right-click and select the
Add -- Sampler -- HTTP Requestoption from the pop-up menu. As you may have guessed, theHTTP Requestrepresents the payload being sent to the server in question. Now select the
HTTP Requesticon you just created. The right pane shows you a series of input fields with which you can define your requests:Server name or IP: We will place127.0.0.1to indicate our local server.Port number: We will use80, the default port used for Web servers.Path: The path is the exact location (URL) where the testing will be done. We will type in/(slash) to indicate the root page of the Web server.
- With the cursor on your
HTTP Requesticon, right-click again and select theAdd -- Listener -- Graph Resultsoption. Repeat this procedure, this time selectingAdd -- Listener -- View Results in Table. These two selections tell JMeter to generate graphic and table results for our stress testing.
Now that you have configured the Test Plan, save it for later reference, then start your stress testing by selecting the Run -- Start option from the main menu on the GUI; if you select the Graph Results icon while you are running this test, you can see an interactive construction of your stress tests results. Later you can query and produce either graph or table results that show a detailed analysis of the tests. I also recommend you measure your hardware usage while you perform these tests with a tool like top. This gives you a broader perspective on how your overall environment is responding to the tests.
User-based testing
If you have ever used another tool or script for testing, you're probably thinking, "You just simulated 1,000 requests on an application -- big deal, I could have done it with a Perl script." You're probably right, but JMeter does allow you to create more powerful stress tests in a few simple steps. Consider a stress test that allows you to simulate a set of users logging in to an application.
To create such a test, you first need to define your set of users in an XML file named users.xml. You can find a sample file located under the bin directory of JMeter's distribution. Your XML file might look like the following:
<?xml version="1.0"?>
<!DOCTYPE allthreads SYSTEM "users.dtd">

   <allthreads>

	<thread>

		<parameter>
                    <paramname>username</paramname>
                    <paramvalue>linuxuser</paramvalue>
                </parameter>
		<parameter>

                    <paramname>password</paramname>
                    <paramvalue>techie</paramvalue>
                </parameter>
		<parameter>
                    <paramname>passwordconfirm</paramname>

                    <paramvalue>techie</paramvalue>
                </parameter>
	</thread>

	<thread>
		<parameter>

                    <paramname>username</paramname>
                    <paramvalue>windowsuser</paramvalue>
                </parameter>
		<parameter>
                    <paramname>password</paramname>

                    <paramvalue>non-techie</paramvalue>
                </parameter>
		<parameter>
                    <paramname>passwordconfirm</paramname>
                    <paramvalue>non-techie</paramvalue>

                </parameter>
	</thread>

        <!-- More threads (users) at your discretion -->

   </allthreads>
|
The XML file is composed of a series of <thread> elements. As pointed out earlier, these threads represent users; nested within each <thread> structure we can find the <parameter> element, which itself nests the <paramname> and <paramvalue> elements. These last items map the parameter name and value that are to be sent with each request. In our case, we define three parameters for each user that simulate the data a user would enter in a typical HTML form.

You next need to place this XML file in the bin directory of your JMeter distribution with the name users.xml, overwriting the existing sample file, but you need to take this step since JMeter reads this location and file name by default.
Based on the same test plan we configured earlier, you then need to change the following input fields in order to simulate each individual user with your stress test:
- Number of threads: From the
Thread Groupoption, change this number to reflect those declared in theusers.xmlfile. - Pre-processors: While placed on the
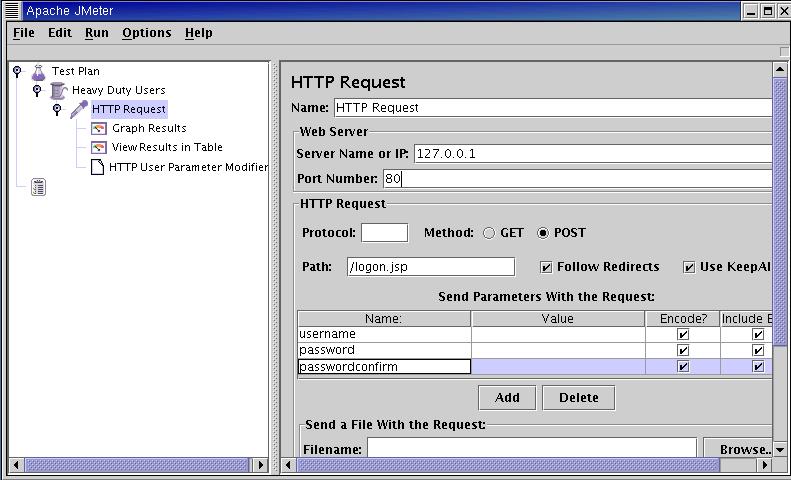
HTTP Requesticon, right-click and select theAdd -- Pre Processors -- HTTP User Parameter Modifierchoice from the pull-down menu. This option tells JMeter to load theusers.xmlfile. - HTTP request: In your
HTTP Request, select thePOSTmethod, since we will be simulating a user login, and change your path to the page that actually processes logins; this is typically a JSP, PHP, or some other server-side script. - HTTP request parameters: In the same
HTTP Requestpane, add the parameter names you defined inusers.xml, while leaving each value field blank. The actual values are picked up from your XML file on each iteration.
Once you have changed these fields, clear all your previous JMeter reports by pressing Ctrl-E or selecting the proper option from the Run menu, and execute your stress test once again.
Notice how easy it is to add individual user inputs to each request, and this just hints at the full capabilities of JMeter. If you are curious enough to explore its other options, you will find JMeter is also capable of simulating requests on databases, LDAP servers, and even more modern applications, such as Web services.
JMeter is a remarkable tool that allows you to be sure that your applications stand up to the workloads you expect on production servers.